Online Help
Introduction
AttacheCase is a powerful file encryption software designed for everyday use. It focuses on a simple appearance and easy operation while employing a world-standard encryption algorithm.
Simply drag and drop files and enter a password to encrypt them easily. When you drag and drop an entire folder, it packs everything together into a single encrypted file.
Data is compressed during encryption, making the file size more compact.
To decrypt (restore the original), simply drag and drop or double-click the encrypted file and enter the password to easily restore the original files and folders.
You can also export files as self-extracting executable (.exe) files. This allows you to share encrypted files with people who do not have AttacheCase installed, enabling them to decrypt the files on their own.
Rich Configuration Options
Options include specifying save locations, complete deletion of files after processing, separate password memory for encryption and decryption, compression ratio adjustment, password attempt limits with data destruction, and command-line options are also available.
World-Standard Encryption Algorithm
The encryption algorithm adopted is the one selected in October 2000 by the National Institute of Standards and Technology (NIST: http://csrc.nist.gov/) as the next-generation encryption standard AES (Advanced Encryption Standard).
An initialization vector (IV) is generated using random numbers and then encrypted in CBC mode, which is designed to prevent analysis by third parties. (For more details, see the “About the Encryption Algorithm” section.)
AttacheCase has been developed as open source, but starting from ver.4, commercial use requires a paid license. (For more details, see “Commercial Use” on the top page.)
How to Use
Encrypting Files/Folders
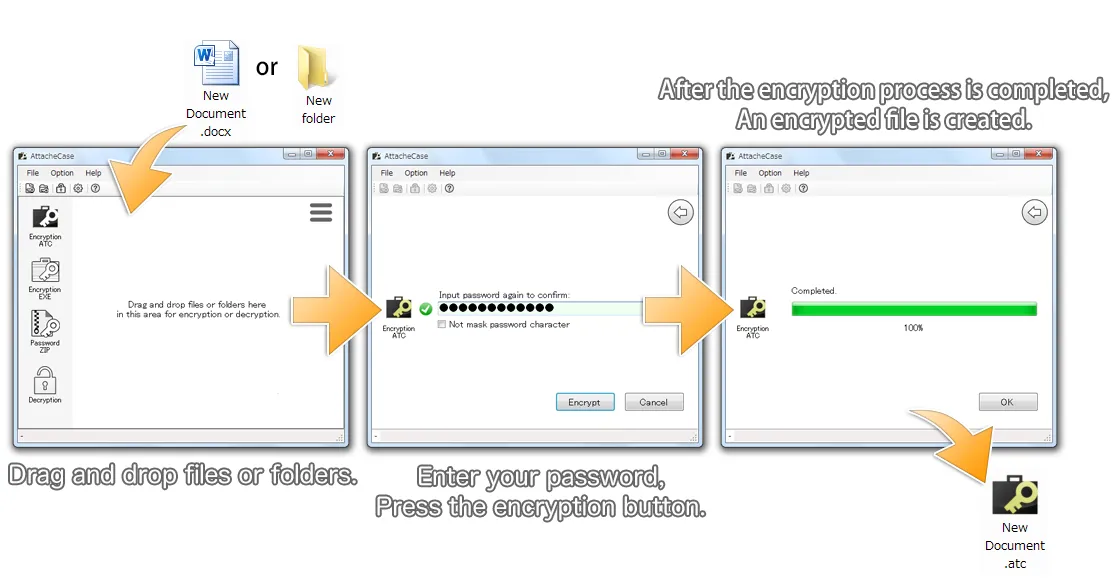
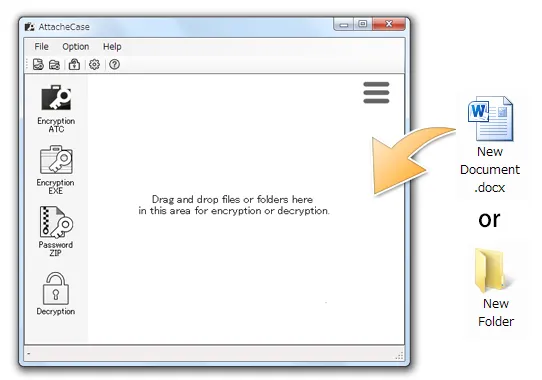
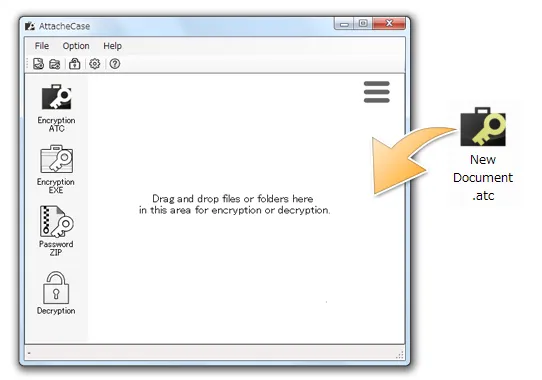
Usage is simple. Just drag and drop the files you want to encrypt onto the AttacheCase shortcut icon or onto the open application window.
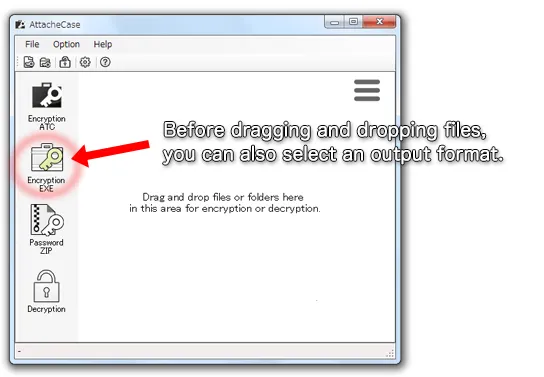
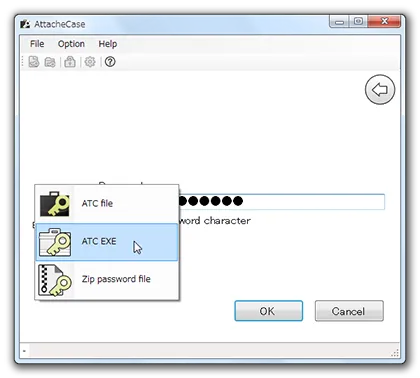
Alternatively, if you already know the output file type in advance, you can select the output format beforehand.
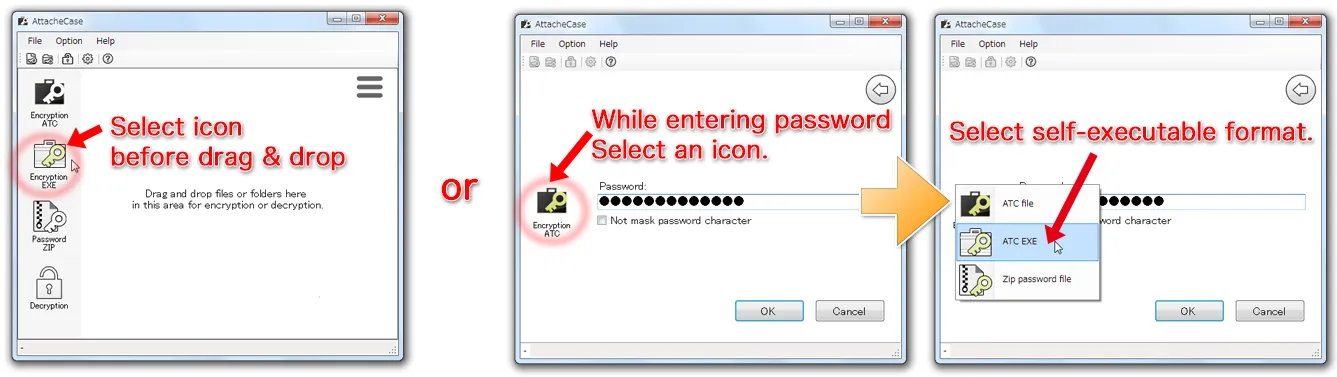
After dragging and dropping the file, enter a password. We recommend entering a long password that is difficult to guess.
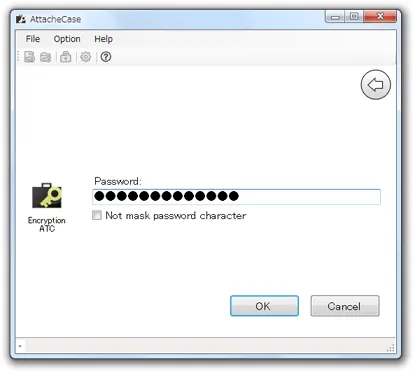
On this screen as well, you can select the output format by clicking the AttacheCase icon.
![]()
After entering the password once and pressing the OK button, you will be prompted to enter the same password again for confirmation. This is to prevent encrypting with an incorrect password, which would make it impossible to restore the original file.
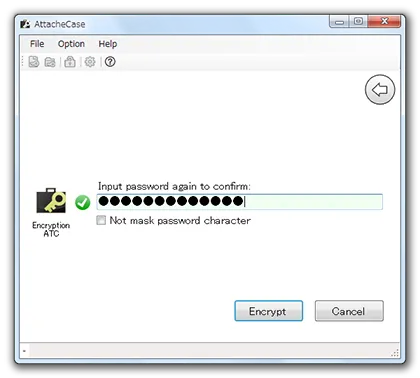
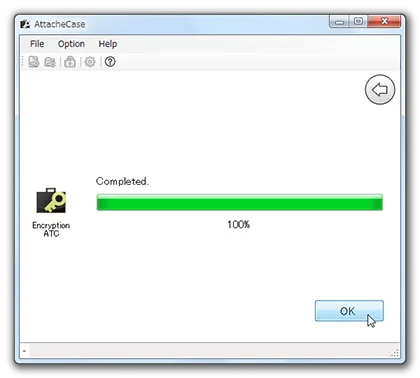
Next, press the “Encrypt” button to start the process. When the “Complete” message appears, the encrypted file has been created.
![]()
Decrypting Files (Restoring to Original)
Just like encryption, drag and drop the encrypted file onto the AttacheCase icon or onto the open application window.
AttacheCase examines the file data directly to automatically determine whether it is an encrypted file, even if the file extension is different. Therefore, you can decrypt self-extracting executable files by dragging and dropping them without any issues.
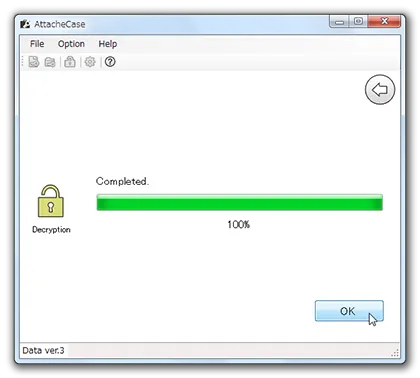
Once the file is confirmed to be an encrypted file, you will be prompted for the decryption password as shown below.

When the “Complete” message appears, the original file should have been created in the same location.
![]()
Self-Extracting Executable Output
On the screens “before encryption” and “after dragging and dropping files/folders,” select the following icon:
![]()
The output will be an executable file (*.exe).
Public Key Encryption
Public key encryption is an encryption method that uses two key files for encryption and decryption.
Normally, as with symmetric key encryption, the same password is used for both encryption and decryption.
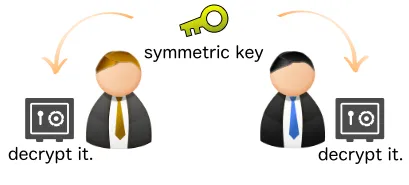
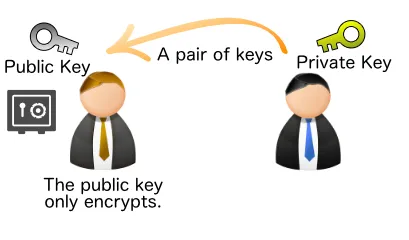
Public key encryption splits the roles into an encryption password (file) and a decryption password (file), creating a pair of “keys.”

This means that even if you send the public key (which can only encrypt), it is safe even if intercepted because it “can only encrypt.” As long as the private key (for decryption) remains in your hands, no one else can restore the encrypted file to its original form.
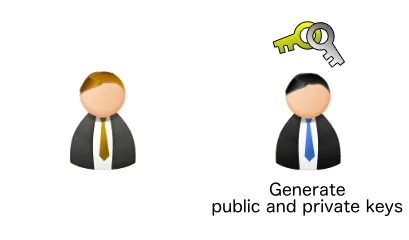
First, generate a pair of public and private keys locally.
Then, send the “public key” to the person you want to exchange data with.
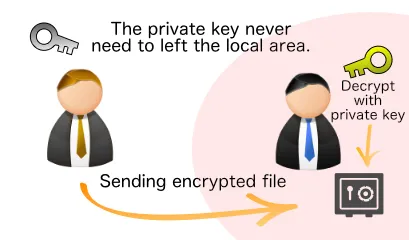
At this point, the private key has not left your local machine, so it remains safe.
Generating Public and Private Keys
Let us actually try encrypting and decrypting with public key encryption in AttacheCase. First, generate a pair of public and private keys.
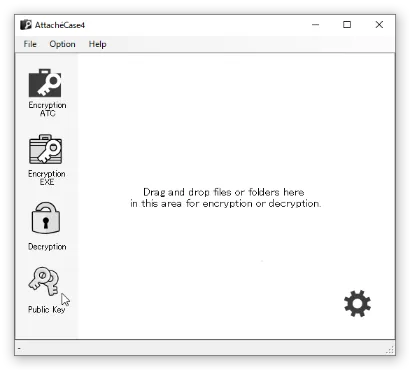
Select “Public Key Encryption” from the main window.
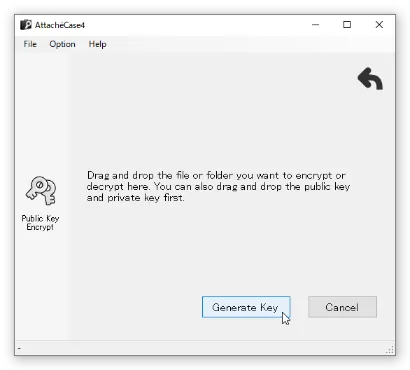
Press the “Generate Keys” button, choose a file name, and generate the public and private keys.
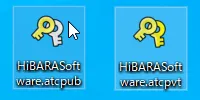
This generates two files: a “public key (.atcpub)” and a “private key (.atcpvt).”
Encrypting Files with the Public Key
Load the previously created “public key (.atcpub)” file into AttacheCase. At this point, information such as the GUID and hash will be displayed. Communicating these values to the recipient through a separate channel from the one used to send the public key reduces the possibility of tampering and enables safer exchanges.
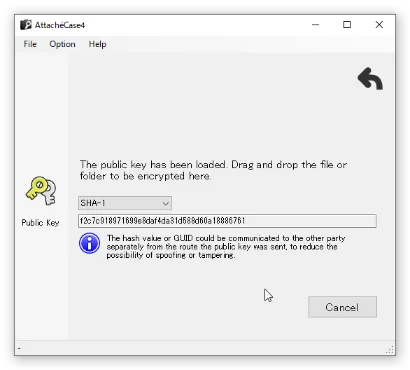
With this screen displayed, drag and drop the file you want to encrypt to complete the encryption.
Decrypting Encrypted Files with the Private Key
Files encrypted with the public key can be decrypted by loading the “private key (.atcpvt).”
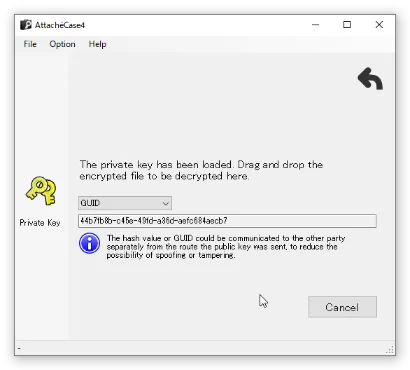
With this screen displayed, drag and drop the encrypted file to decrypt it.
Settings
General
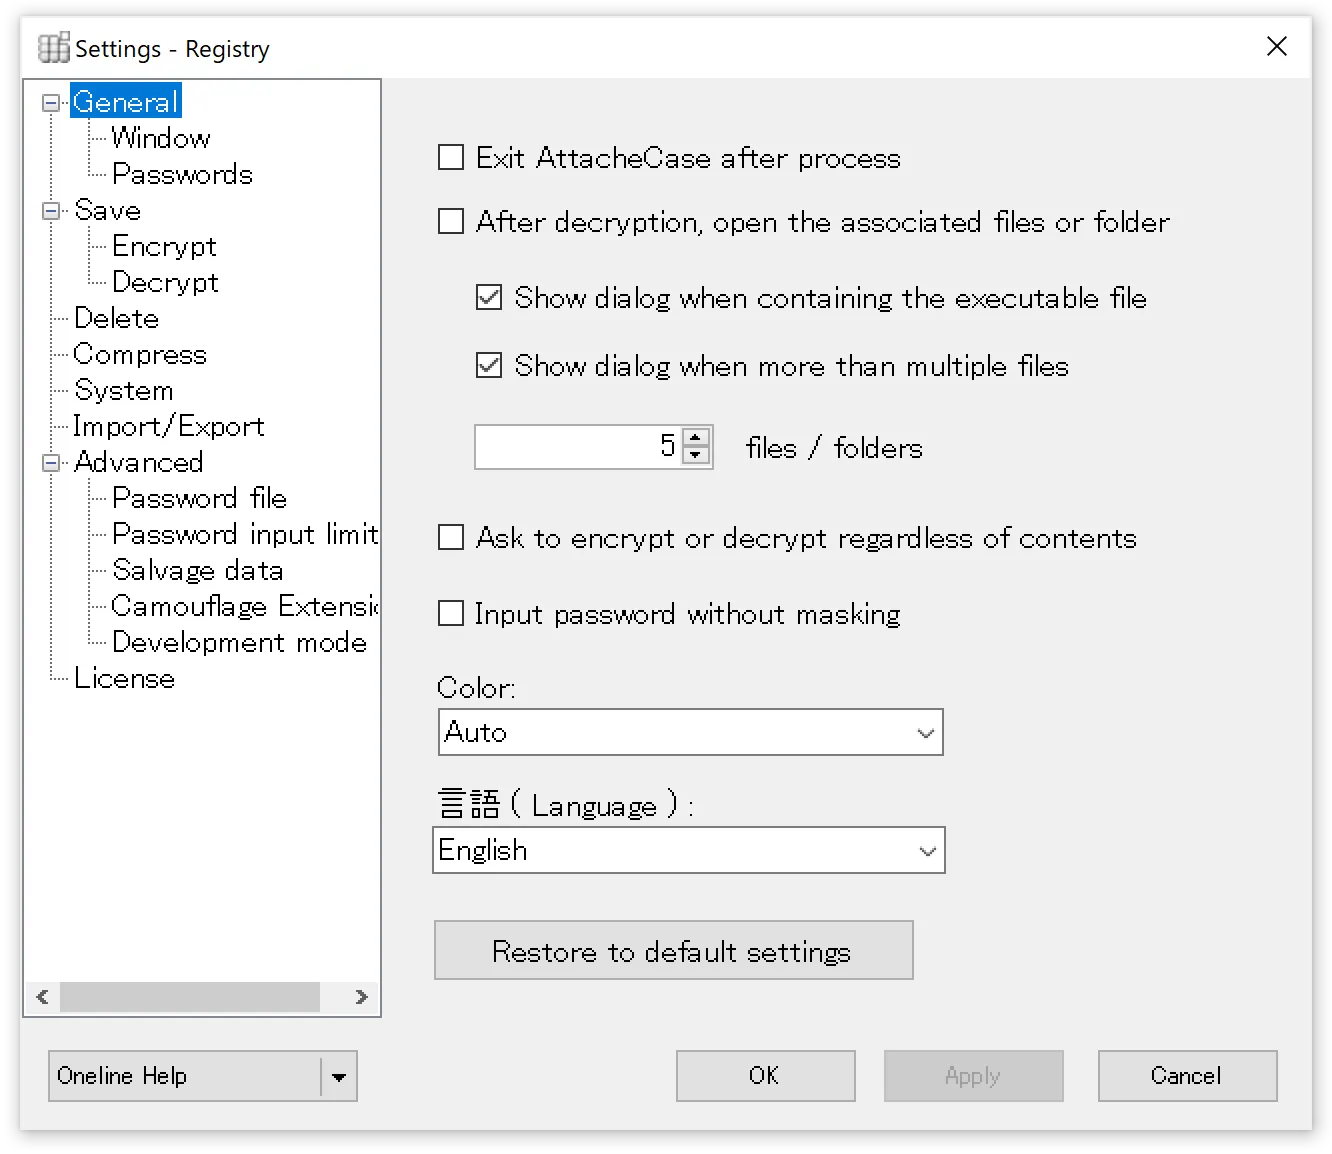
Close AttacheCase after processing
When checked, the application will automatically close after encryption or decryption processing is complete, as long as there are no errors.
Open associated file after decryption
When checked, decrypted files will be opened with their associated application. Be careful, as all files will be launched if many files were encrypted.
Show warning dialog when executable files (*.exe) are included
When encrypting, if the files include executable files, a warning dialog will be displayed. If the above option is enabled, EXE files will be executed directly, so it is recommended to keep this checked.
Show warning dialog when there are multiple files
Similarly, if “Open associated file after decryption” is checked and a large number of files are included, all associated applications would launch. By setting an upper limit for the number of files to open, a warning dialog will be displayed in advance.
Always ask whether to encrypt or decrypt regardless of content
Normally, AttacheCase automatically determines the file type and processes accordingly. If you always want to choose whether to encrypt or decrypt, check this option to be prompted before processing.
Enter password without hiding characters
On the password input screen, the password can be entered without masking (hiding) the characters. This helps prevent entering incorrect characters.
Color
You can choose the appearance color of AttacheCase. Selecting “Auto” will change according to the Windows 10 theme.
Language
AttacheCase supports English display in addition to Japanese. If you want to use AttacheCase in English even on a Japanese OS environment, you can set it to English here.
Window

Always minimize during processing
AttacheCase will minimize during encryption/decryption processing.
Minimize without showing in taskbar
During processing, AttacheCase will minimize without displaying the icon in the taskbar.
The reason there is no option to both minimize and remove the icon from the taskbar is that once processing begins, there would be nowhere to stop the process.
Show in taskbar
The AttacheCase icon is always displayed in the taskbar when launched.
Keep window on top of desktop
The window is displayed in front of all other windows (other applications) on the desktop. This makes it easier to drag and drop files.
Do not allow multiple instances of AttacheCase
Only one window is used at a time. If a second instance is launched while this setting is ON, the already running instance takes priority (the new window will not be displayed).
Turn on IME for all password input text boxes
When checked, the IME will automatically turn on when a password input text box receives focus.
Passwords
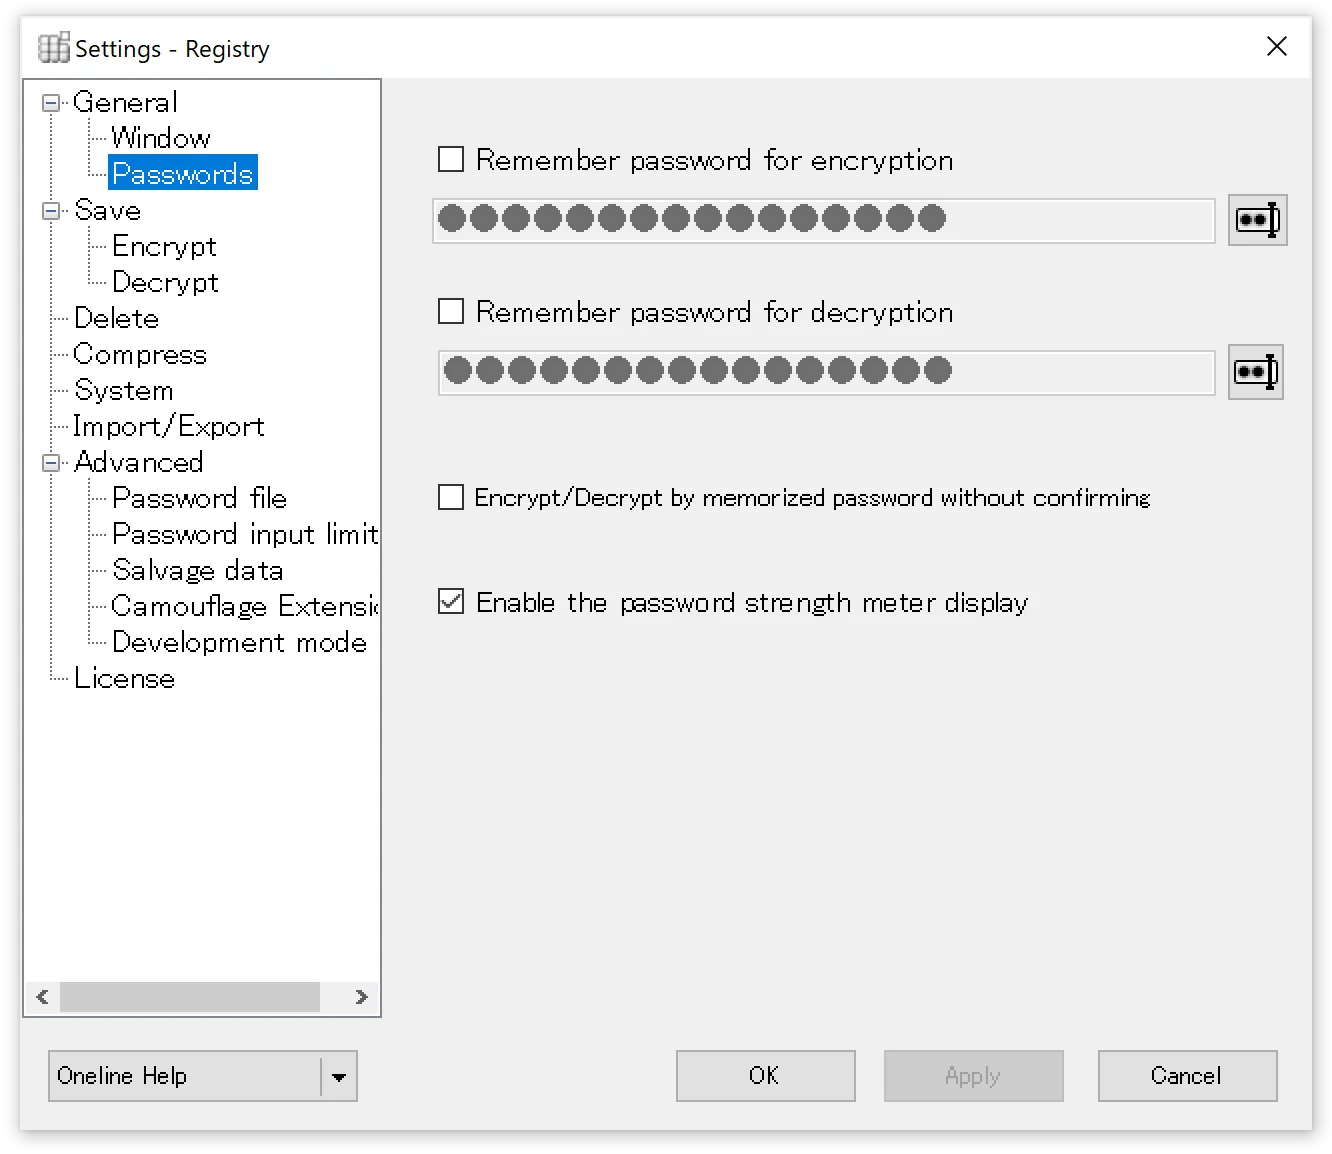
Save password for encryption
When checked and a password is specified, it will be automatically used as the encryption password.
Save password for decryption
Similarly, when a password is specified, it will be automatically used as the decryption password.
Execute with stored password without confirmation during encryption/decryption
When checked, encryption/decryption processing will proceed immediately without confirming the stored password.
Show password strength meter
When checked, the strength of the entered password will be displayed in real time. The strength meter algorithm uses Dropbox’s implementation.
Save
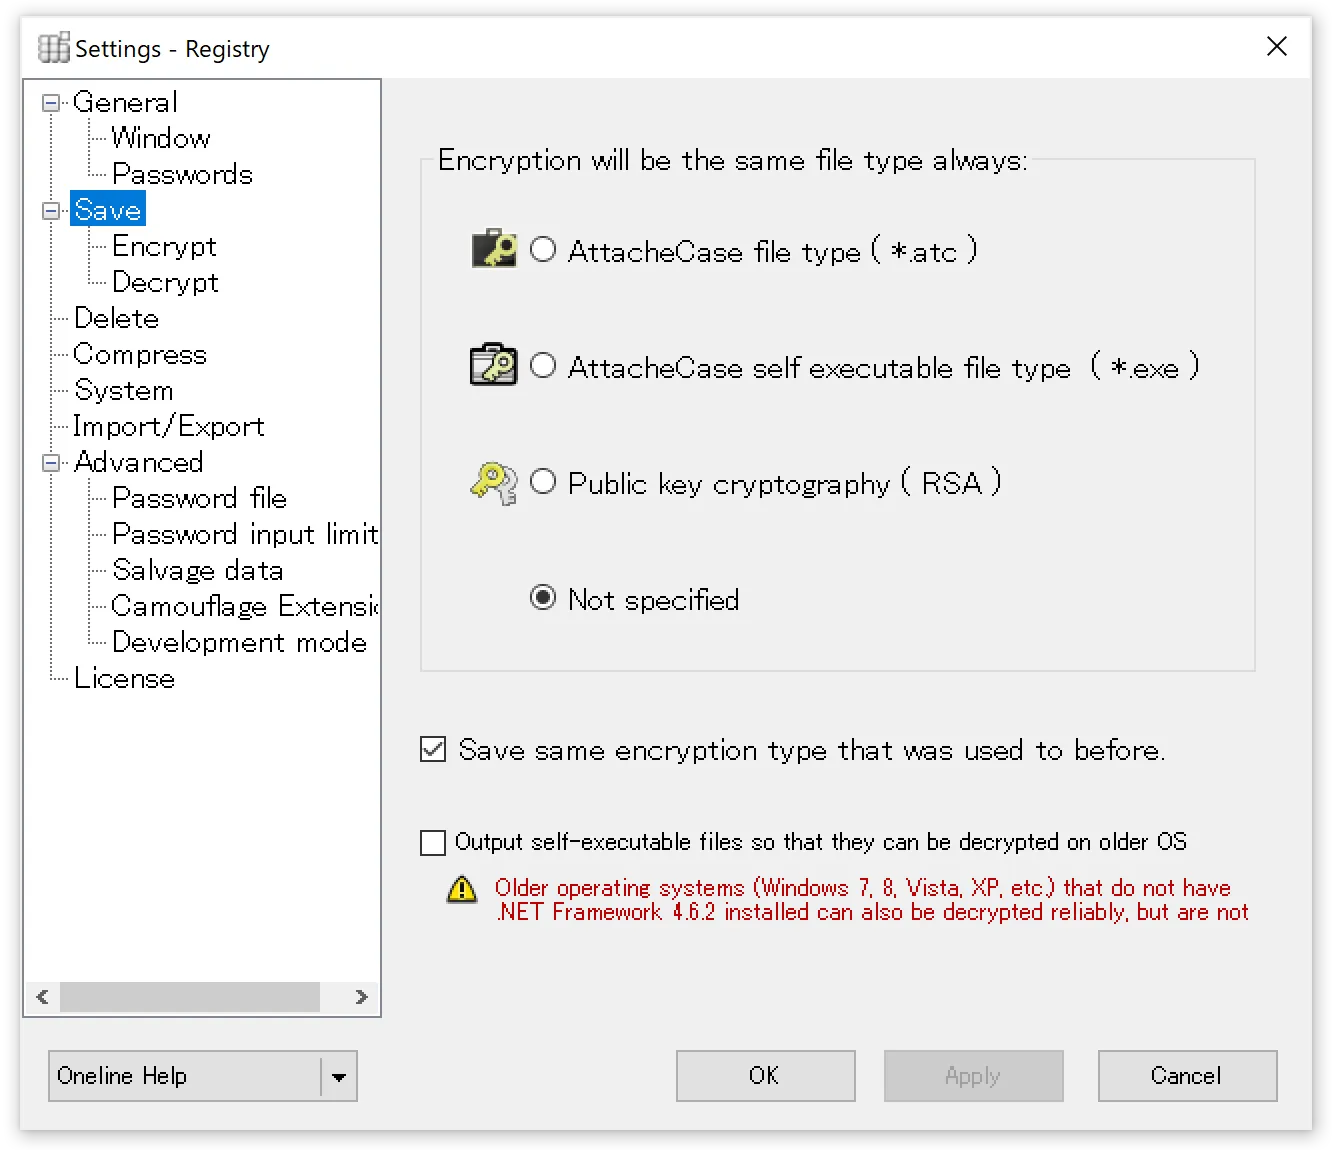
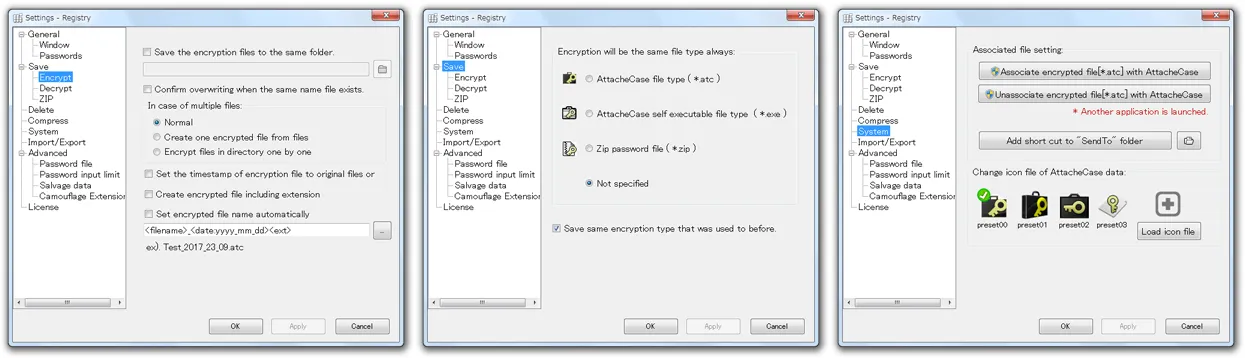
Always select encrypted file type
Select the encrypted file format to always output. If automatic processing settings such as password omission are not configured, you can also reselect the file type on the main window.
Encrypt using the previously used file type
Remembers the type of the previously created encrypted file and uses the same file type for the next operation.
Output self-extracting executable for older OS compatibility
Enables decryption on older operating systems (Windows 7, Vista, XP, etc.) where .NET Framework 4.6.2 is not installed.
Specifically, when this checkbox is turned ON, a self-extracting executable that can run on .NET Framework 4.0 will be output.
However, since .NET Framework 4.0 is no longer supported by Microsoft, self-extracting executables output with this option enabled are also unsupported. Please use with caution.
Encryption
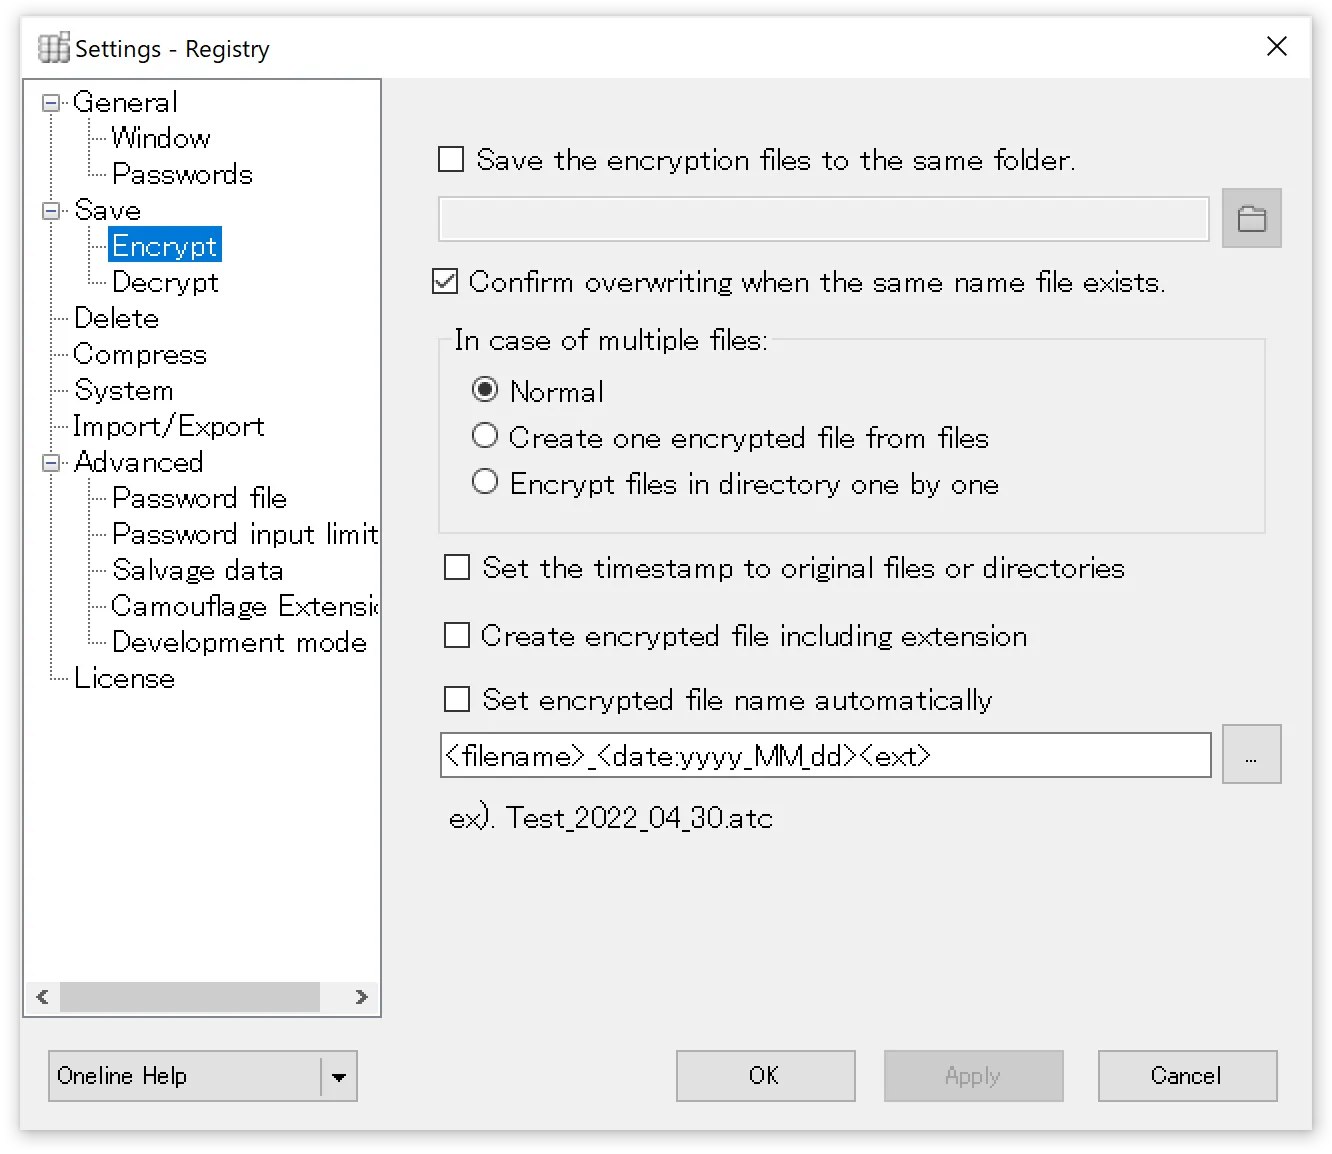
Always save encrypted files to the same location
Encrypted files will always be saved to the specified folder.
Confirm overwrite when a file with the same name exists
When checked, a confirmation dialog will be displayed for files with the same name. When unchecked, the file will be overwritten without confirmation.
Multiple files
- Normal — Encrypts while preserving the folder contents and hierarchy.
- Combine multiple files into one — When multiple files or folders are dropped in, they are combined into one and encrypted.
- Encrypt files in folder individually — Each dropped file or folder is encrypted individually.
Preserve original file and folder timestamps
When checked, files and folders are encrypted with their original timestamps. When unchecked, the timestamp at the time of encryption is used.
Include extension in encrypted file name
The extension of encrypted files is normally (*.atc), but for example, when files have the same name but different types (e.g., proposal.doc, proposal.xls), they would all become the same file name “proposal.atc.” To avoid this, the extension is included in the name, outputting as “proposal.doc.atc” and “proposal.xls.atc.”
Auto-generate encrypted file name
Specify the format for encrypted file names. You can append dates, sequential numbers, etc. For custom date-time format strings, please refer to the Microsoft documentation.
Decryption
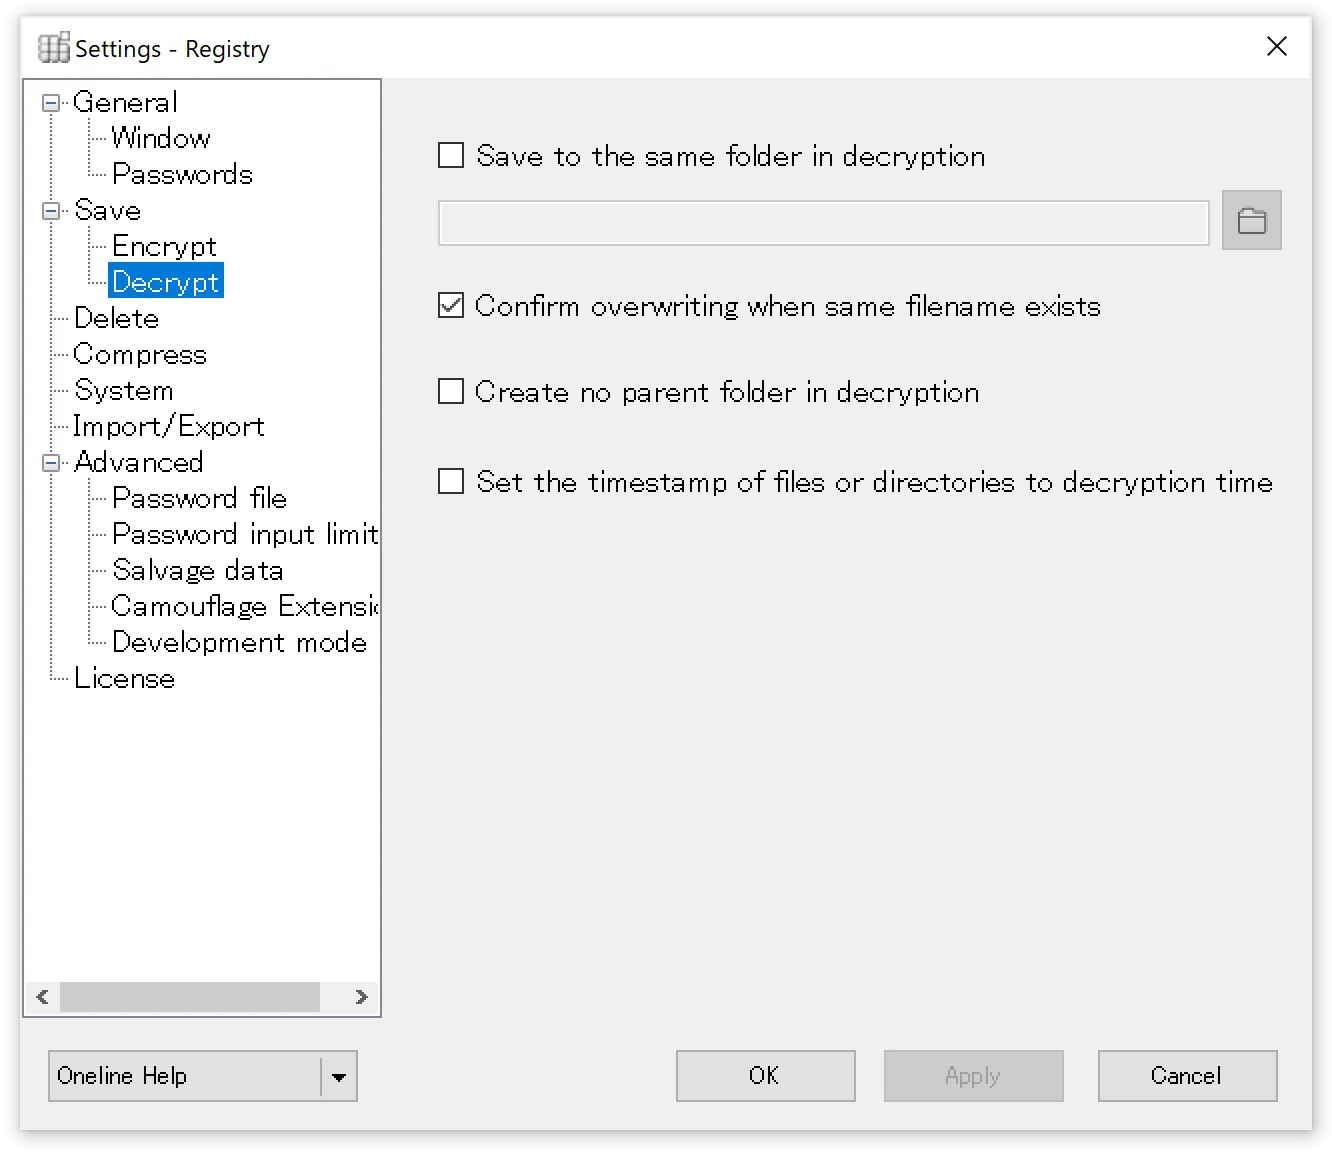
Always save decrypted files/folders to the same location
Specify the folder where original files will be restored when decrypting encrypted files.
Confirm overwrite of files with the same name
When checked, if a file with the same name exists at the decryption destination, a confirmation dialog will be displayed.
Do not create parent folder during decryption
During decryption, the parent (root) folder is not created, and the contents are extracted directly to the decryption destination folder.
Match file and folder timestamps to decryption time
Regardless of the timestamp at the time of encryption, timestamps are set to the time of decryption (slight differences may occur between files when there are many).
Deletion
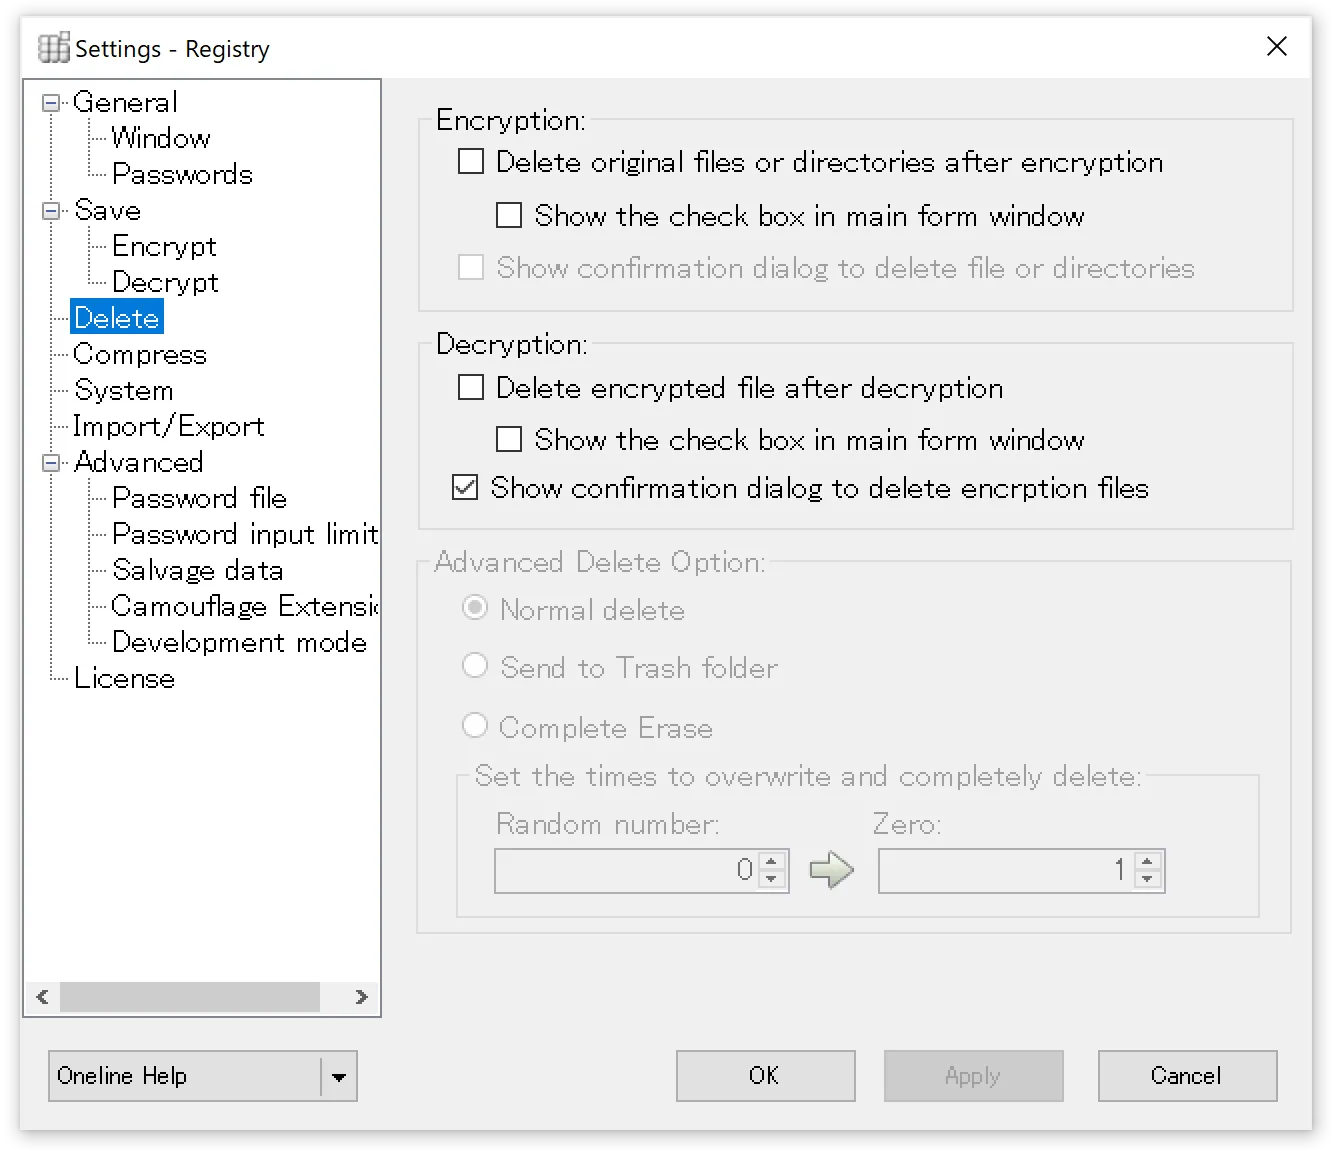
Delete original files after encryption is complete
Deletes the original files or folders after encryption is complete. The specific deletion method is determined by the “Advanced Deletion Settings” below.
Show deletion checkbox on main window
Displays a checkbox for the above deletion option on the main window. This allows you to decide whether to delete during the encryption process.
Show deletion confirmation message after encryption
A dialog appears before deletion, allowing you to confirm whether to delete.
Delete encrypted file after decryption
Deletes the original encrypted file after decryption. The specific deletion method is determined by the “Advanced Deletion Settings” below.
Show deletion checkbox on main window
Displays a checkbox for the above deletion option on the main window. This allows you to decide whether to delete during the decryption process.
Show deletion confirmation message after decryption
A dialog appears before deletion, allowing you to confirm whether to delete.
Advanced Deletion Settings
Normal deletion
Deletes files or folders without going through the Recycle Bin. This is equivalent to the keyboard shortcut [Shift]+[Delete].
Send to Recycle Bin
Sends to the Recycle Bin. No dialog is displayed, but this is equivalent to the keyboard shortcut [Delete].
Complete deletion
“Number of overwrite passes for complete deletion” specifies how many times data is overwritten before deleting the file. Normal deletion simply removes the entry information on the hard disk. This setting enables secure deletion that makes recovery difficult by performing either random data overwrites or zero-fill overwrites before deletion.
More passes make recovery from the hard disk more difficult, but processing time increases accordingly.
The default is 0 random overwrites and 1 zero-fill overwrite.
Compression
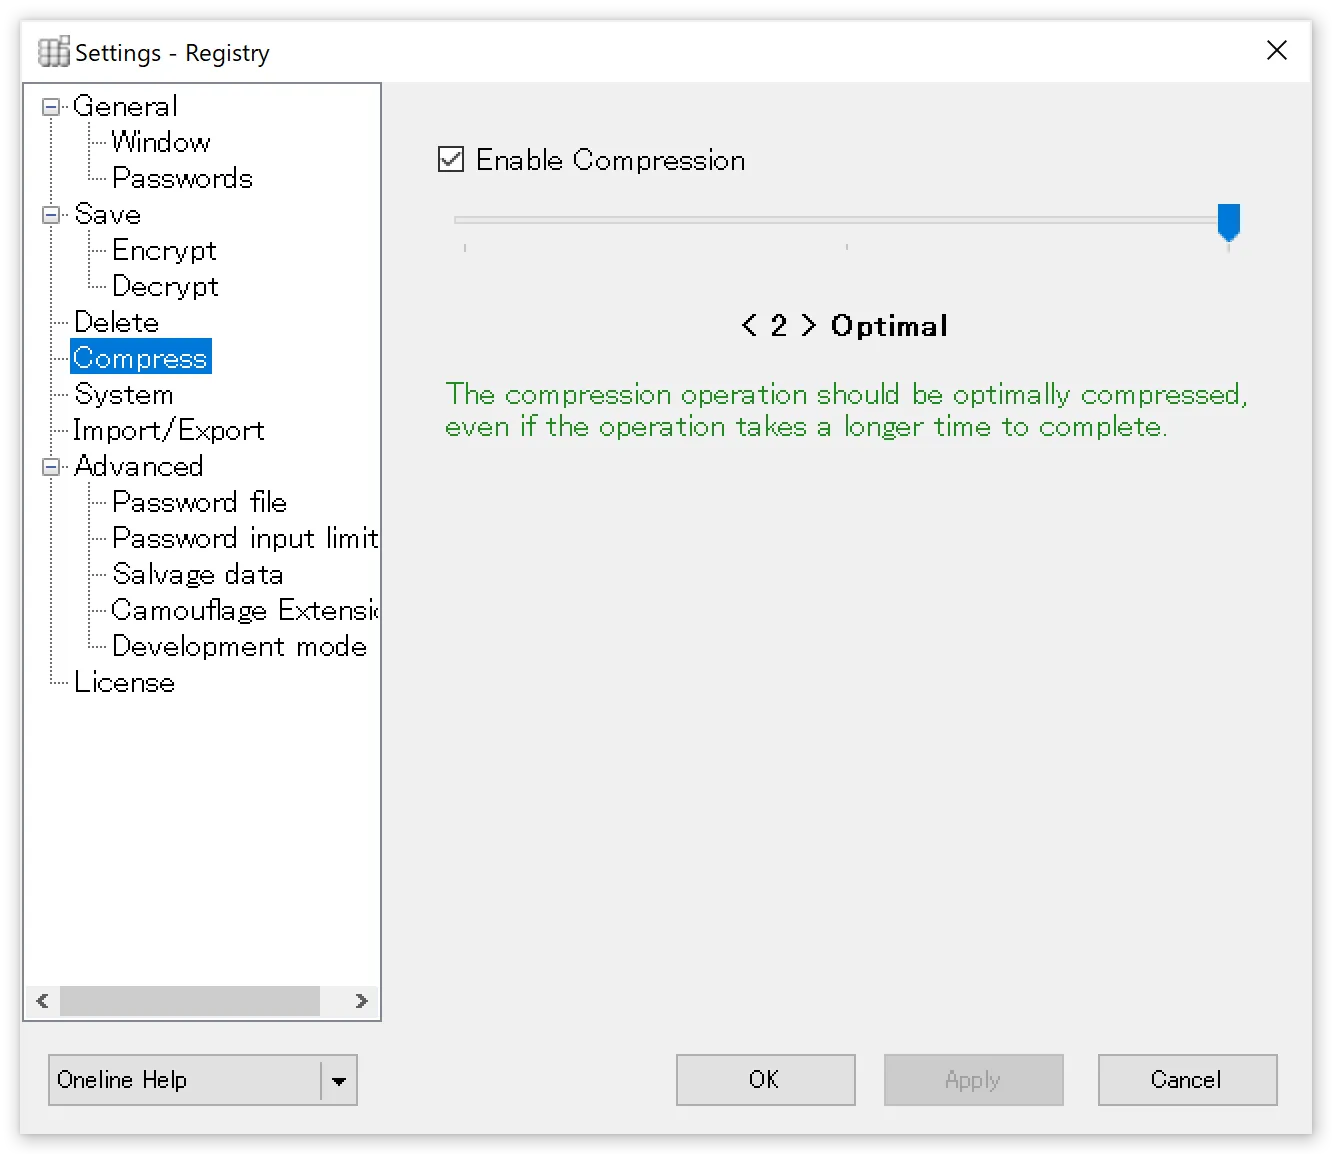
Compress
When checked, data compression is performed during encryption.
You can also adjust the compression ratio using the slider bar.
The default setting is < 2 > [ Optimal ]. This setting performs optimal compression even if the compression operation takes time to complete.
Selecting < 1 > [ Fastest ] completes the compression operation as quickly as possible, even if the resulting file is not optimally compressed.
Selecting < 0 > [ No Compression ] automatically turns off the checkbox and performs no compression on the file.
System Settings
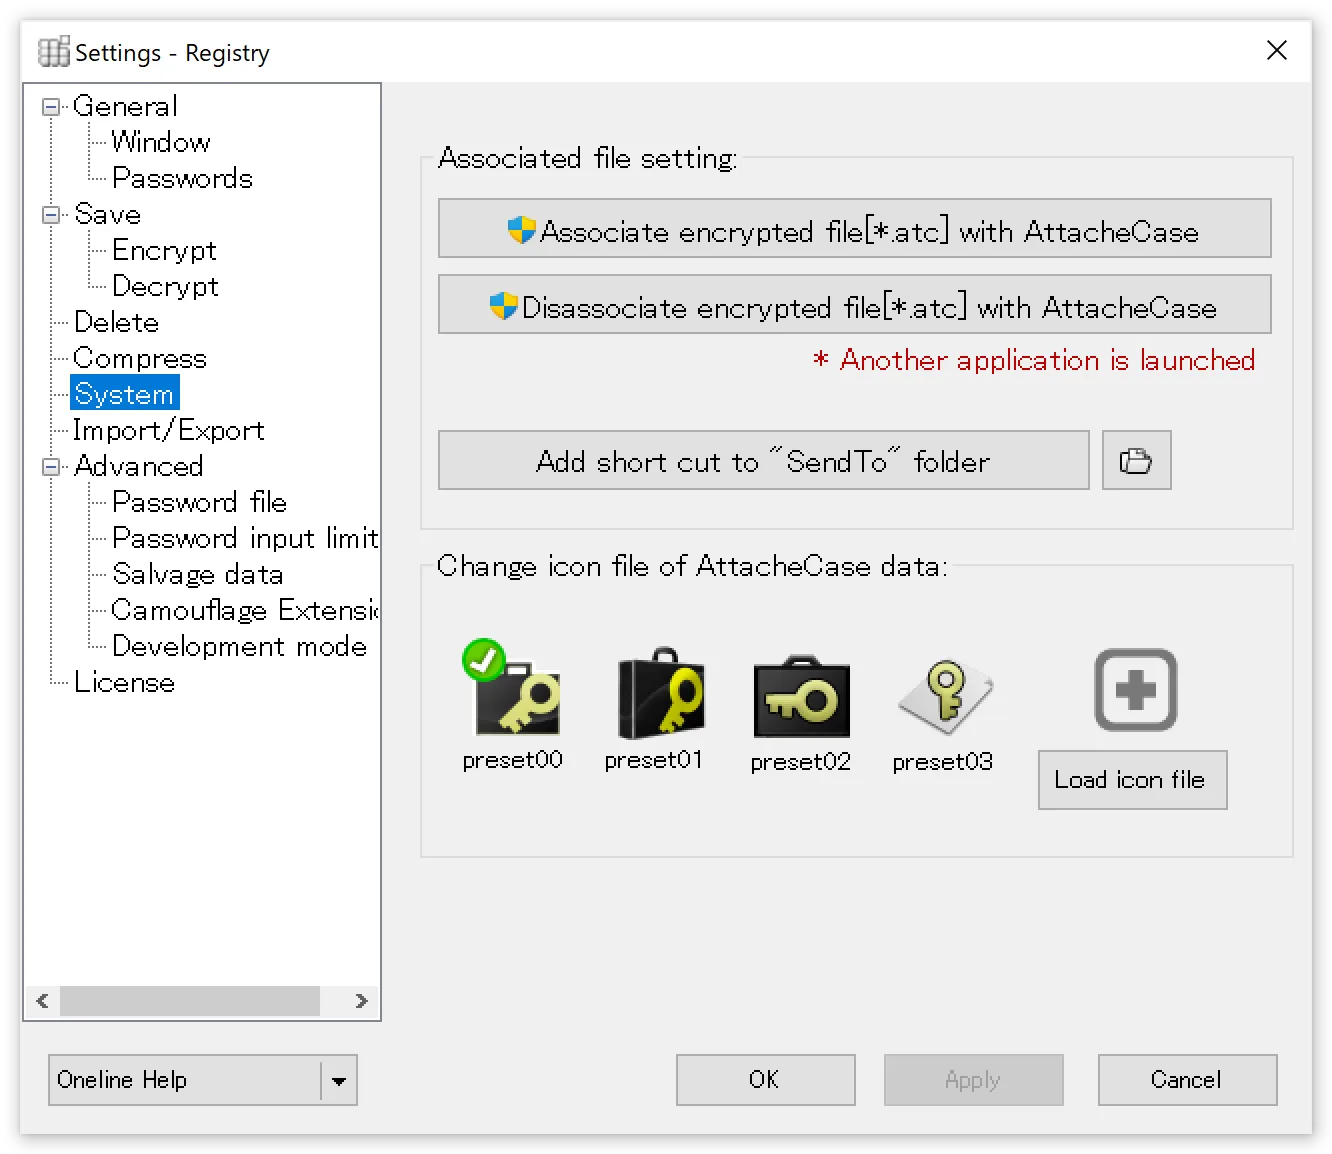
Associate encrypted files (*.atc) with AttacheCase
Requires administrator privileges. The association is performed by the companion application (AtcSetup.exe) included with AttacheCase. If the association is successful, *.atc files should display the selected icon shown below.
Remove association of encrypted files (*.atc)
Removes the association between *.atc files and AttacheCase. Use this when you want to uninstall manually. This also requires administrator privileges and runs a separate application.
Create shortcut in “Send To” folder
Adds an “AttacheCase” menu item to the Explorer context menu’s “Send To” option.
Change AttacheCase file icon
You can change the icon for encrypted files to a preset icon or a user-created icon.
Save/Restore Settings
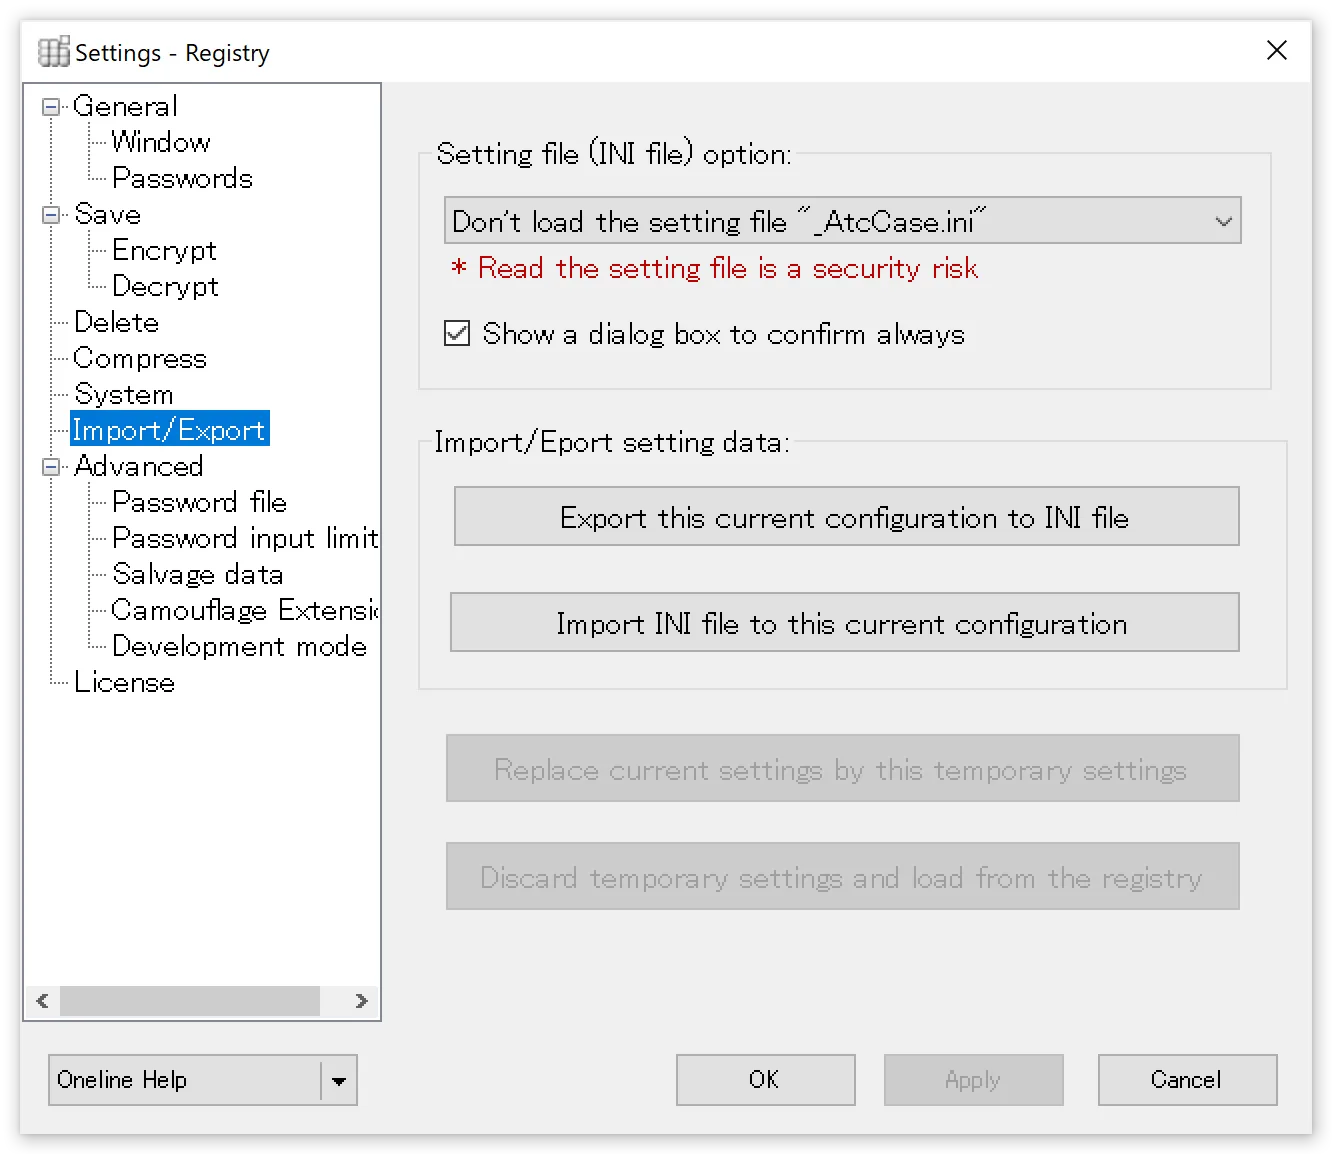
Always load the settings file “_AtcCase.ini”
When checked, AttacheCase will always attempt to load the settings file “_AtcCase.ini” from the directory containing the executable or the directory containing the encrypted file.
Display confirmation dialog box each time
When checked, if the settings file “_AtcCase.ini” is found, a confirmation dialog box will be displayed asking whether to load it.
Save current settings to INI file
Current operational settings can be exported and saved as command-line options in an INI file, batch file, text file, etc. This can be used as a base for creating other script files.
By outputting as an INI file and placing it in the executable or current directory, AttacheCase can be launched with temporary settings. For more details, see the next section, “How to Use INI Files.”
Load settings from INI file as current settings
Loads the contents of the settings file “_AtcCase.ini” as current settings. Settings are saved to the registry.
Replace temporary settings with current settings
Replaces the temporary settings from command-line launch with the main settings and saves them.
However, the settings are saved when AttacheCase exits.
Note that the button is disabled (cannot be pressed) during normal launch.
How to Use INI Files
AttacheCase can save settings as an .INI file separately from the registry. By loading the created .INI file individually, you can switch operational settings at startup.
This is a convenient feature for those who want to always launch AttacheCase with their preferred settings, such as when encrypted files need to be decrypted on different PCs in various locations, or when bringing AttacheCase to environments where it is not installed via USB flash drive.
What is an INI File?
![]()
It is text information that stores application configuration settings.
Although the extension is “.ini,” the contents are a text file.
Users can edit it with a text editor, but please be cautious as incorrect changes may cause unpredictable behavior.
AttacheCase stores its settings in the Windows system (registry) rather than in an ini file, so this file is not inherently required. However, it is convenient to save and use an INI file when you want to transfer settings to another PC or when you want to separate settings for different operations.
How to Create an INI File
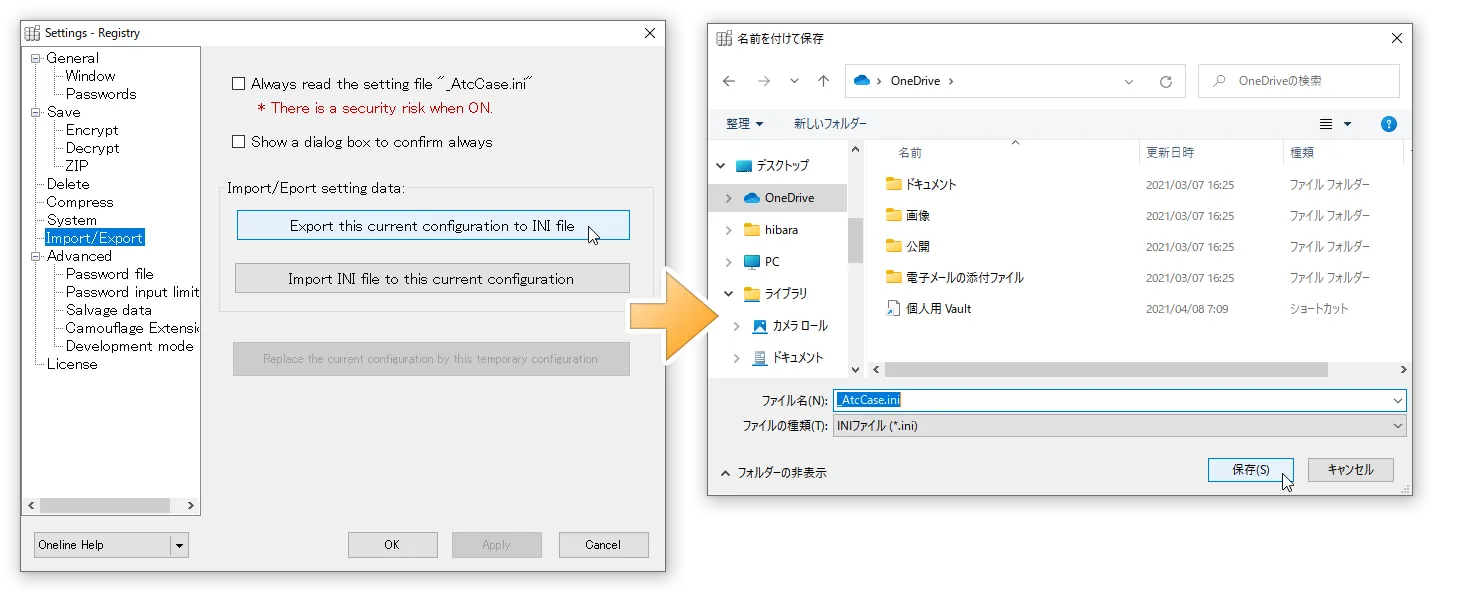
Open the “System” tab in the settings and press the “Export current settings” button.
Select the INI file format and output with the file name “_AtcCase.ini.” All current settings will be written here.
How to Load an INI File
To launch with the settings from the .INI file output in the previous step, you need to place the “_AtcCase.ini” file in one of the following locations and then launch AttacheCase:
- Current directory
- The directory where the AttacheCase executable (AtchCase.exe) is located
- The directory where the files to process or encrypted files are located
The “_AtcCase.ini” file is searched in the above order, and it is loaded when found. If INI files are placed in multiple locations, unexpected settings behavior may occur.
Normally, when launching AttacheCase without doing anything (without placing a settings INI file anywhere), it starts with the settings stored in the registry.
Place the .INI file in the same location as the AttacheCase executable (AttacheCase.exe) as shown below.
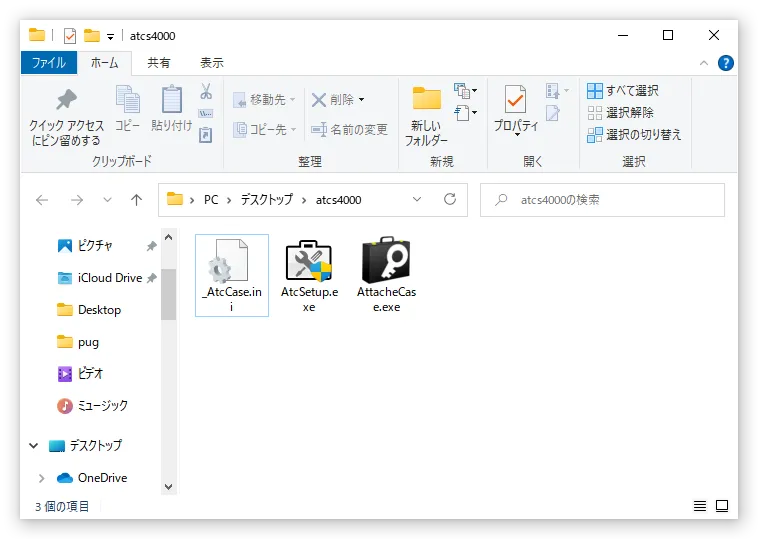
Alternatively, place the .INI file next to the files to process or the encrypted files.

In the latter case, files/encrypted files must be dragged and dropped directly onto the AttacheCase icon or launched via file association (note that dropping files after launching will not reference the .INI file in that directory).
By doing this, AttacheCase will launch with the operational settings from the .INI file temporarily applied.
When You Want to Apply INI File Contents as Current Settings
After loading the .INI file using the method described above, open the “System” tab in the settings and press the “Replace temporary settings with main settings” button.
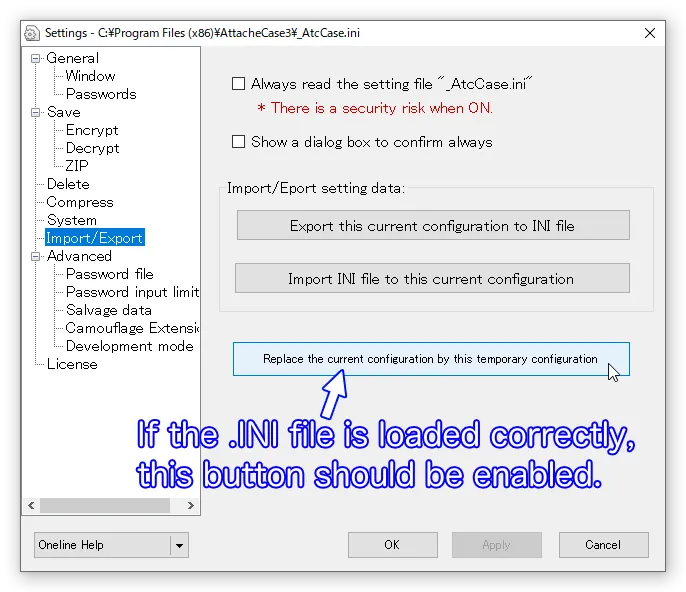
This will load the contents of the .INI file into the registry, overwriting the main settings.
Advanced Settings
Password File {#settings-password-file}
Allow drag and drop of password files
When checked, on the password input window, instead of typing a string, you can drag and drop any file to use it as a “password” substitute.
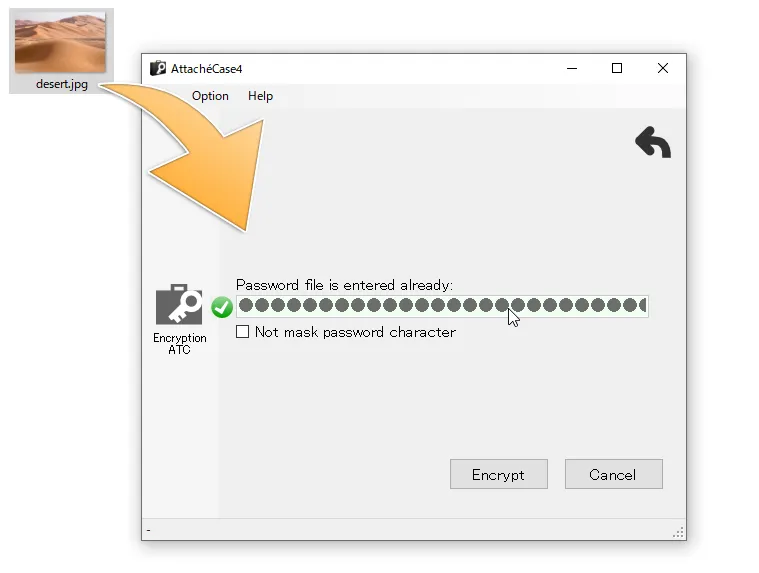
In this example, the file “desert.jpg” serves as the password file.
Internally, a condensed small unique data (256-bit) is generated from the dropped file and used as the password.
The message digest algorithm used for file condensation is SHA-256.
For example, when encrypting a Word document, specifying a photo image (*.jpg) from your My Pictures folder as the password increases concealment effectiveness. There is no risk of the password string being guessed, and if you additionally keep the password file in a separate location (such as external media), security is further enhanced.
However, if you delete or edit/overwrite the file specified as the password, the password will be lost. This requires careful handling.
Even if you change just one character (or 1 byte), the condensed data changes dramatically (see “From SHA-1 to SHA-256” for details). Think of the file specified as the password as the key in its entirety.
Misuse of this feature can result in data loss and is extremely dangerous. Please use it carefully and at your own risk. It is recommended to set the file specified as the password to “read-only” beforehand.
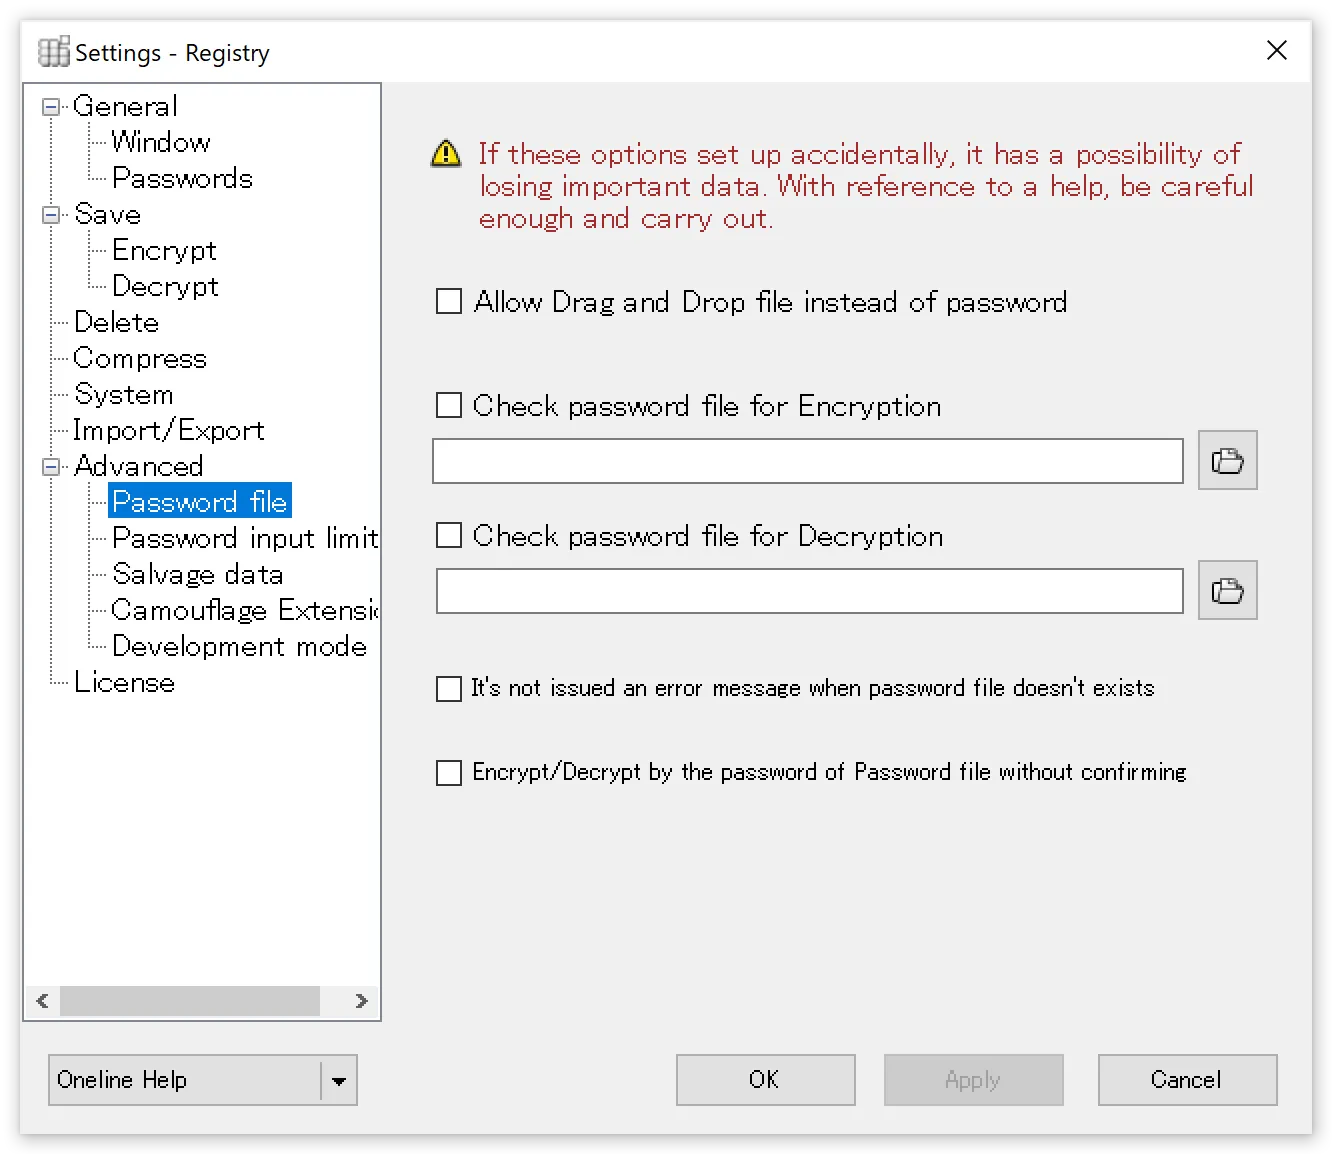
Auto-check password file during encryption
Auto-check password file during decryption
When checked, the specified password file is loaded and encryption/decryption is performed automatically.
If using the same password for both encryption and decryption, specify the same file path in both fields.

If you save the password file on external media (such as a floppy disk or USB flash drive), it can function as a pseudo-physical key.
Save the specified password file on a USB flash drive and carry it with you. Insert it only when performing encryption/decryption, and have the system check that location. This way, it functions as a pseudo-physical key.
The file is read directly and set as the password.
However, the password file name will be displayed directly here. If someone else starts AttacheCase and views this settings panel, the password file location will be fully visible. If you want to maintain security on your PC, handle this with care.
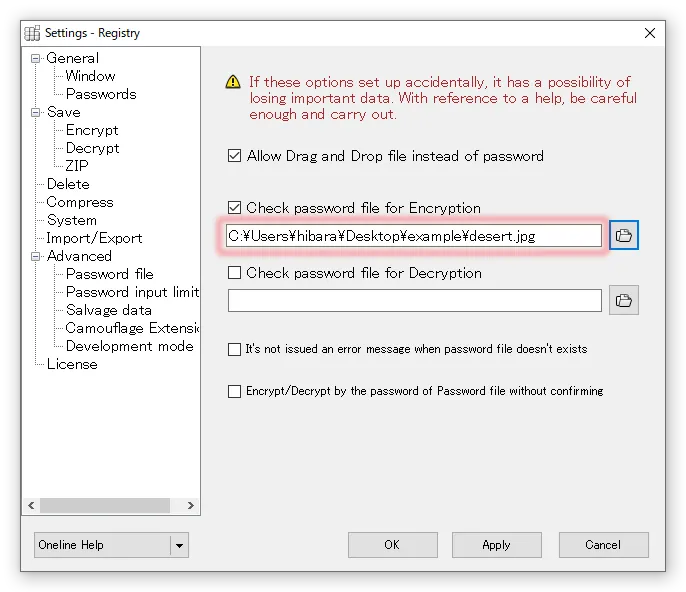
Not only the location of the password file, but even the file name is fully visible…
In any case, specifying a file stored locally rather than on removable external media is not recommended from a security standpoint.
Do not show error message even if password file is missing
When checked, no error message will be displayed even if the password file is not found at the specified location.
Execute with password file without confirmation during encryption/decryption
When checked, encryption/decryption processing is executed immediately without going through the password input screen.
Password Input Limit
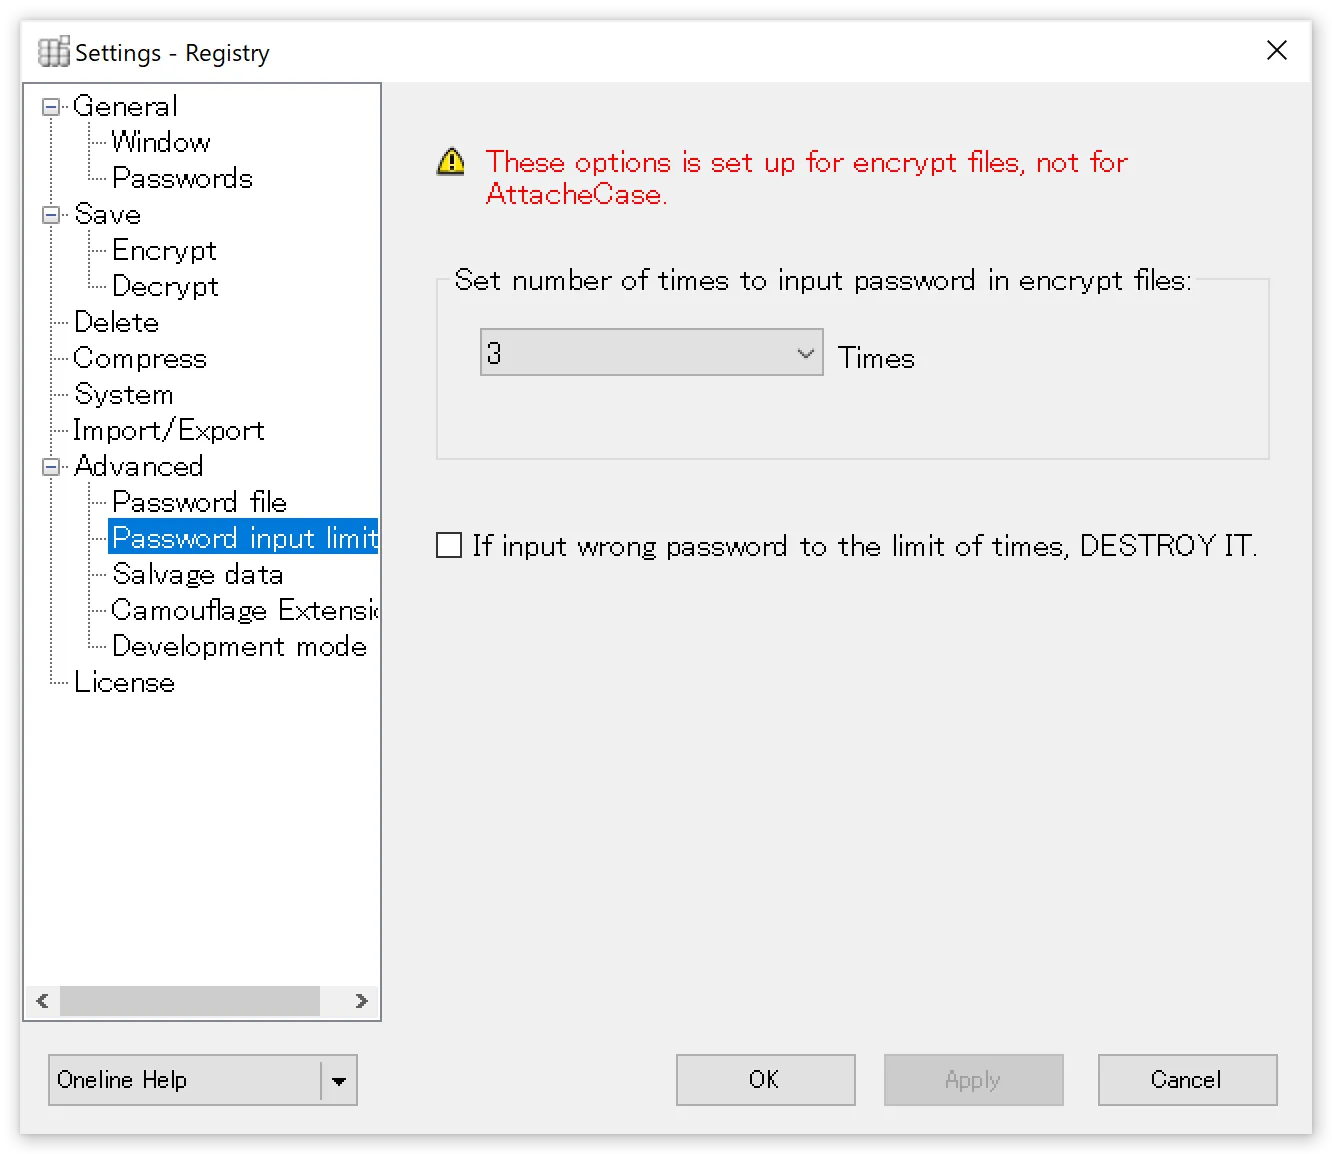
Set password input limit on encrypted files
Sets a limit on the number of password attempts for encrypted files.
Destroy encrypted file after exceeding the attempt limit
When the number of attempts set above is exceeded, the encrypted file self-destructs so that it can never be decrypted again.
Enabling this setting will result in the loss of your important data. Please use with extreme caution and at your own risk.
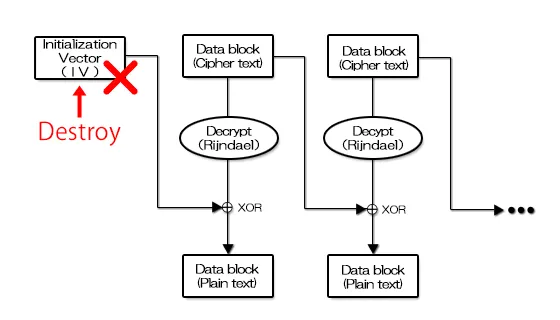
The specific destruction method involves corrupting the IV portion stored near the beginning of the encrypted file, as shown in the diagram below.
In essence, the first block of the encrypted section is destroyed, making it impossible to obtain the data necessary for decryption thereafter, rendering recovery extremely difficult.
Data Salvage
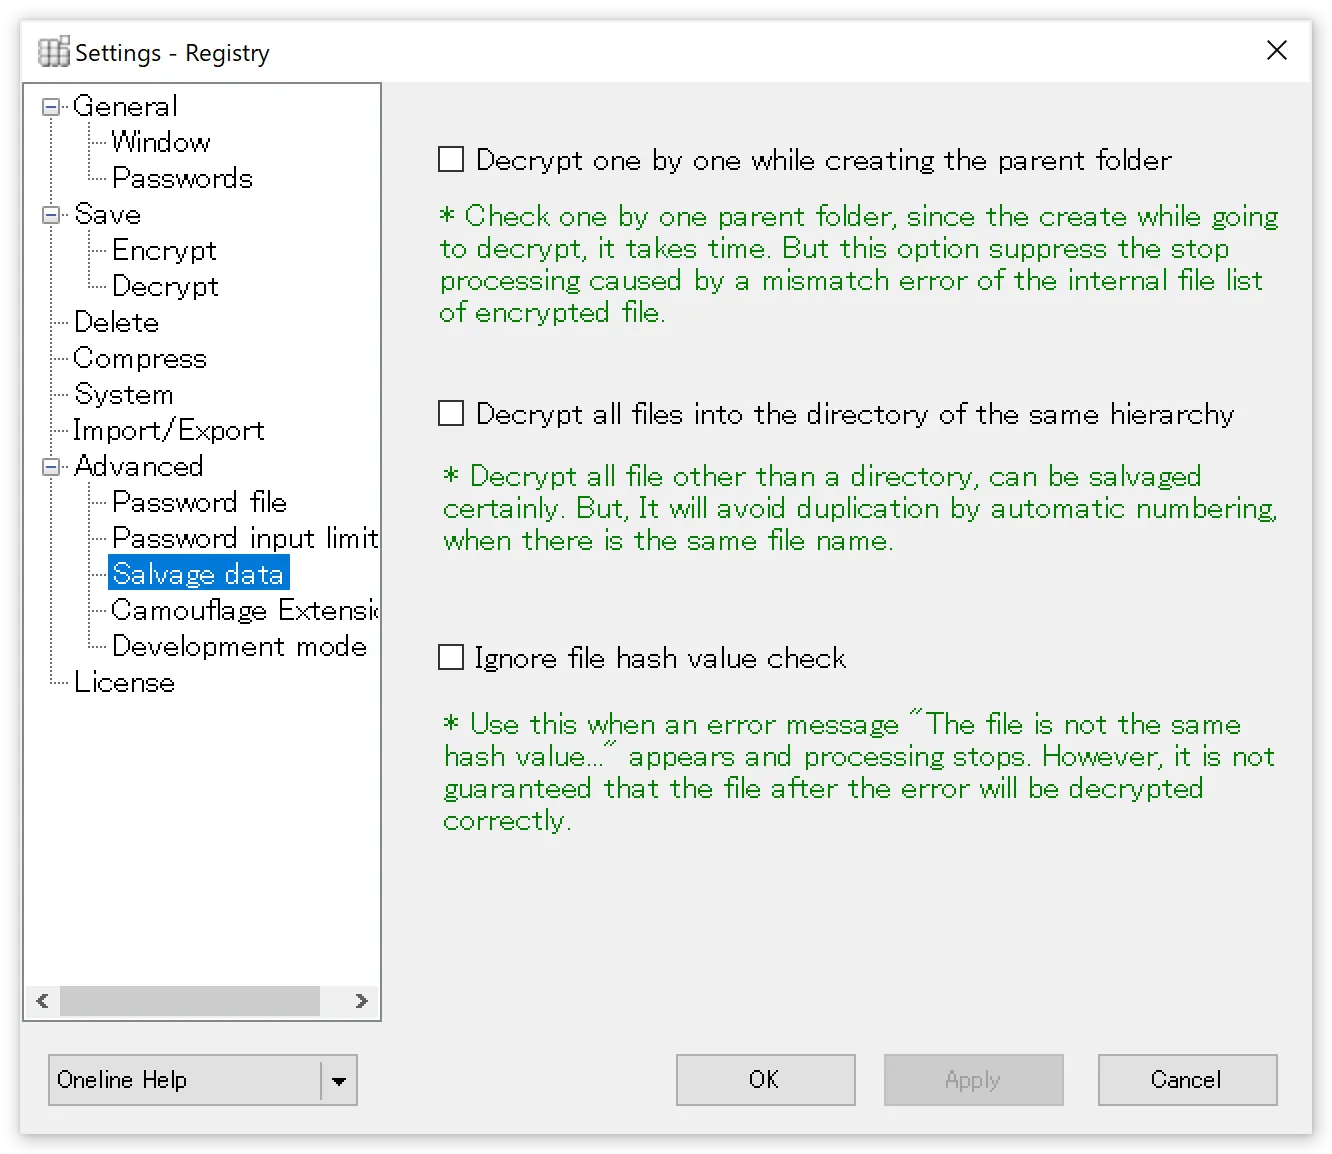
This is an emergency option to be used in the unlikely event that files are encrypted with an invalid file path structure, making all files difficult to recover.
Decrypt while checking and creating parent folders one by one
Decryption proceeds while checking and creating parent folders one by one, so it takes time. This suppresses processing interruptions caused by inconsistencies in the file list within the encrypted file.
Decrypt all files to the same directory level
All files are decrypted excluding directories, ensuring reliable salvage. When files with the same name exist, numbers are automatically appended to avoid duplicates.
Ignore file hash value checks
Prevents the process from stopping with the message “File hash values do not match” and completes the decryption process to the end. However, since this is essentially a file integrity error, there is no guarantee that all files have been correctly decrypted.
Extension Camouflage
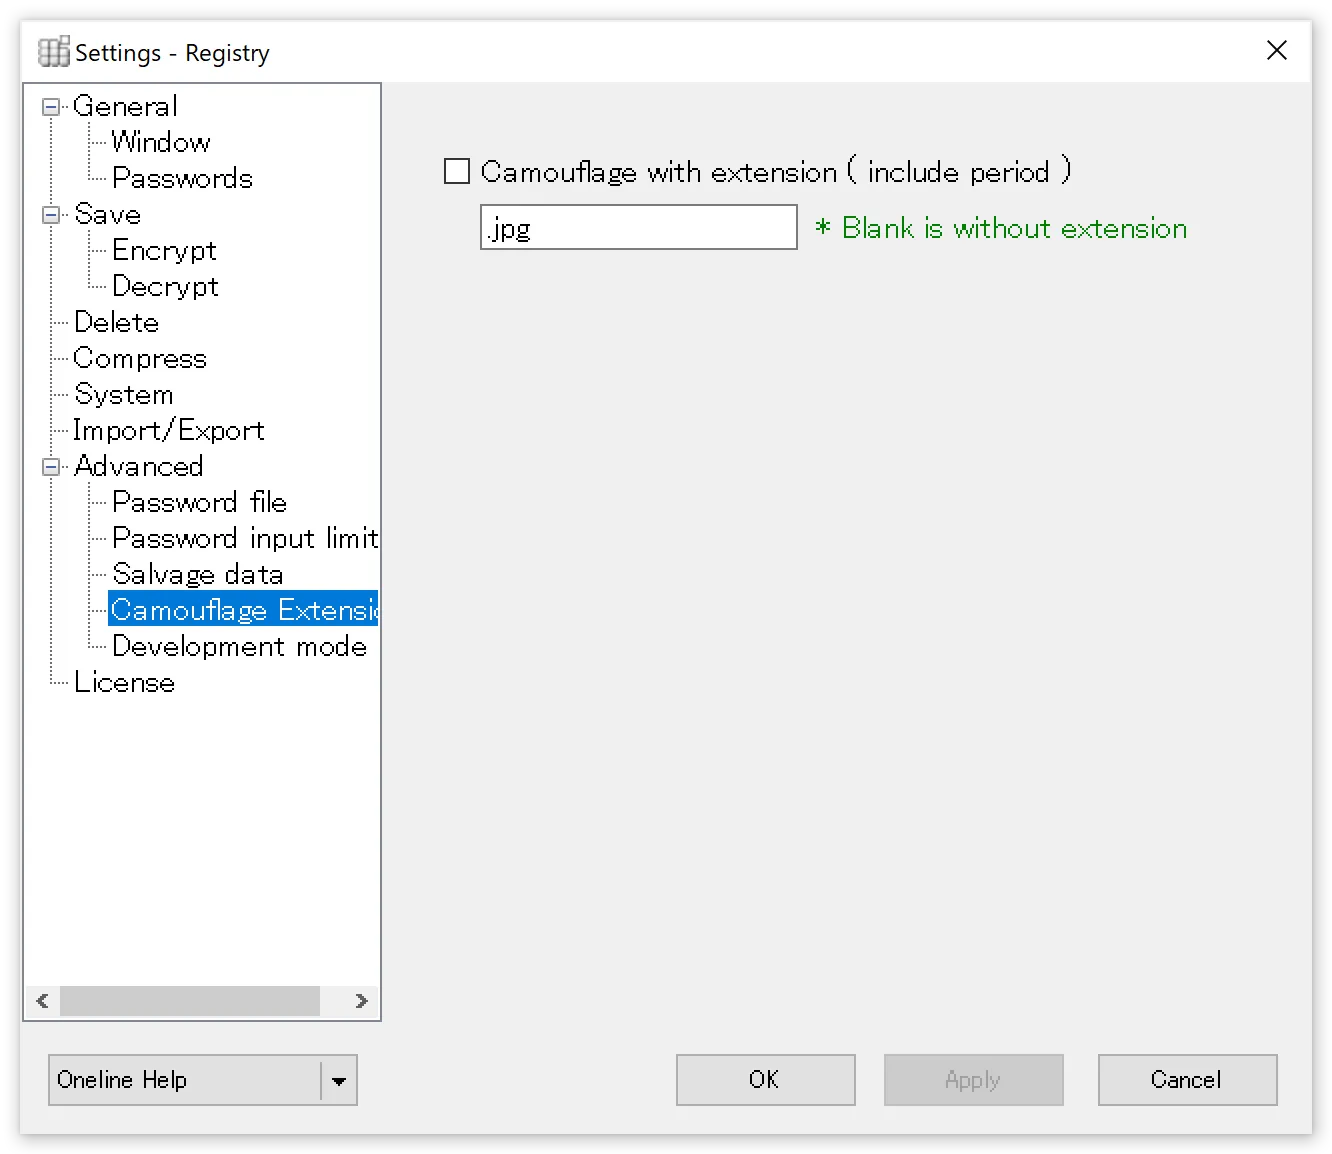
The encrypted file contents remain the same, but instead of “.atc” or “.exe,” a specified extension is used. This makes it impossible to tell at a glance that the file was encrypted with AttacheCase. While launching AttacheCase via file association will no longer work, dragging and dropping the file onto the running AttacheCase will still recognize it as an encrypted file.
Developer Mode
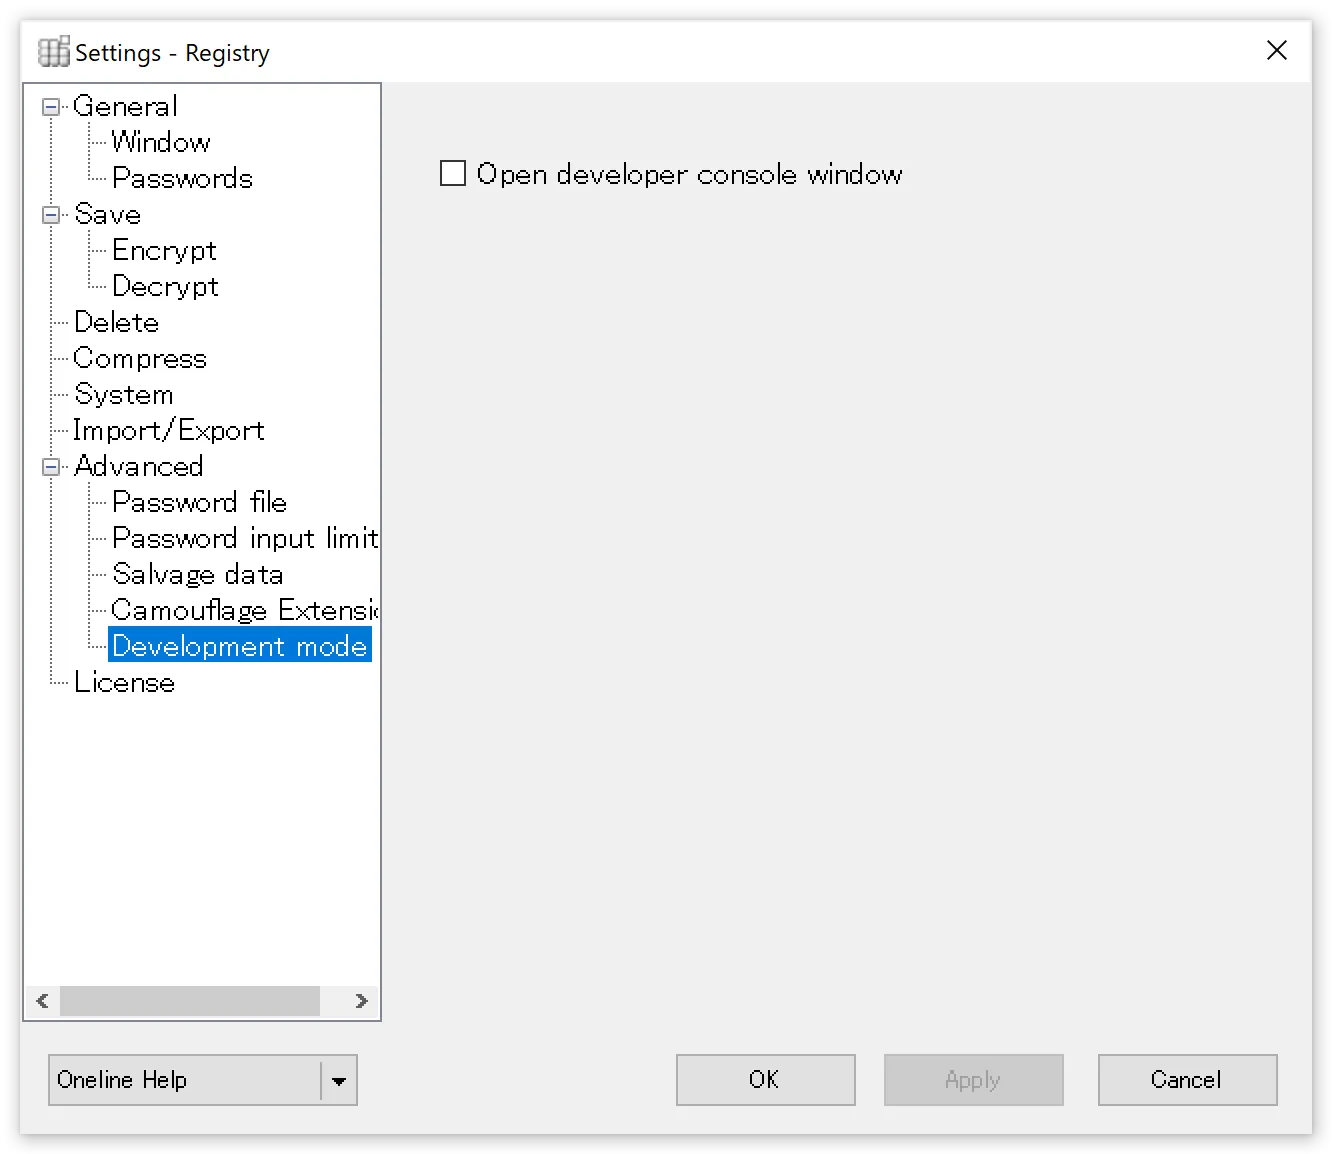
Open developer console window
When checked, a separate developer console window opens during encryption/decryption. You can extract and view header information including file lists and other information needed for development. This is primarily used when analyzing AttacheCase data to develop other applications.
Command-Line Options
If you do not know what “command-line options at startup” means, this section is not relevant to you. Please skip ahead.
This page explains customization methods for users who want to use AttacheCase in a more advanced manner.
AttacheCase can perform encryption/decryption processing by passing arguments at startup. It can be controlled from other applications or operated from batch files. For example, creating an AttacheCase shortcut and writing arguments in the “Target” field to use different passwords for encryption and decryption might be a convenient use case.
General Settings
/p=[PASSWORD]
Password
ex). /p=hirakegoma If the path contains spaces: ex). “/p=hirake goma”
/mempexe=[0,1]
Execute with stored password without confirmation
ex). /mempexe=1 To require confirmation: ex). /mempexe=0
/psm=[0,1]
Show password strength meter
ex). /psm=0 To show the password strength meter: ex). /psm=1
/wmin=[0,1]
Always minimize window during processing
ex). /wmin=1 To not always minimize during encryption/decryption: ex). /wmin=0
/tskb=[0,1]
Do not show in taskbar when window is minimized
ex). /tskb=1 To show in taskbar: ex). /tskb=0
/tsktr=[0,1]
Show icon in system tray
ex). /tsktr=1 To hide the icon: ex). /tsktr=0
/opd=[0,1]
Open folder after decryption
ex). /opd=1 To not open the folder: ex). /opd=0
/opf=[0,1]
Open decrypted files with associated software
ex). /opf=1 To not open files: ex). /opf=0
/exit=[0,1]
Exit AttacheCase after processing
ex). /exit=1 To not exit: ex). /exit=0
/front=[0,1]
Show window in foreground on desktop
ex). /front=1 To not bring to foreground: ex). /front=0
/nohide=[0,1]
Enter password visibly without hiding with ”*” or ”●”
ex). /nohide=1 To hide password input: ex). /nohide=0
/theme=[light, dark, auto]
Select AttacheCase color theme. These are “Light,” “Dark,” and “Auto” respectively.
ex). /theme=dark To launch with “Light” theme: ex). /theme=light
/exeout=[0,1]
Always output as self-extracting executable
ex). /exeout=1 To not output as executable: ex). /exeout=0
/chkexeout=[0,1]
Show checkbox on main form
ex). /chkexeout=1 To hide the checkbox: ex). /chkexeout=0
/askende=[0,1]
Ask whether to encrypt or decrypt
ex). /askende=1 To not ask: ex). /askende=0
/en=1
Explicitly specify encryption
Specifying this option transitions to “Encryption” processing at startup. The ask option is ignored even if specified.
/de=1
Explicitly specify decryption
Specifying this option transitions to “Decryption” processing at startup. The ask option is ignored even if specified.
/nomulti=[0,1]
Do not allow multiple instances
ex). /nomulti=1 To allow multiple instances: ex). /nomulti=0
/imeon=[0,1]
Turn on IME for all password input text boxes
ex). /imeon=1 To not turn on: ex). /imeon=0
/notmaximized=[0,1]
Do not start in maximized mode when PC is in tablet mode
ex). /notmaximized=1 To maximize according to tablet mode: ex). /notmaximized=0
Save Settings
/exeolder=[0,1]
Output self-extracting executable for older OS compatibility
Specifically, outputs a self-extracting executable based on .NET Framework 4.0.
ex). /exeolder=1 For .NET Framework 4.6.2: ex). /exeolder=0
/saveto=[PATH]
Always save encrypted files to the same location
ex). /saveto=MyData
If the path contains spaces: “/saveto=C:\Documents and Settings\User1\My Documents”
/dsaveto=[PATH]
Always decrypt files to the same location
ex). /dsaveto=MyData
If the path contains spaces: “/saveto=C:\Documents and Settings\User1\My Documents”
/ow=[0,1]
Confirm overwrite for files with the same name
ex). /ow=1 To not confirm overwrite: ex). /ow=0
/orgdt=[0,1]
Match encrypted file timestamp to original file
ex). /orgdt=1 To keep the timestamp as generated: ex). /orgdt=0
/now=[0,1]
Set decrypted file timestamp to creation time
ex). /now=1 To keep the original timestamp: ex). /now=0
/allpack=[0,1]
Combine multiple files into one encrypted file
ex). /allpack=1 To not combine: ex). /allpack=0
/oneby=[0,1]
Encrypt/decrypt files in folder individually
ex). /oneby=1 To not process individually: ex). /oneby=0
/nopfldr=[0,1]
Do not create parent folder during decryption
ex). /nopfldr=1 To create parent folder during decryption: ex). /oneby=0
/withext=[0,1]
Include extension in encrypted file name
ex). /withext=1 To not include: ex). /withext=0
/autoname=[FORMAT]
Automatically append encrypted file name
ex). /autoname=<filename>_<date:yymmdd><ext> If autoname is not specified, this feature is OFF. If the path contains spaces: ex). “/autoname=<filename>_<date:yymmdd><ext>“
Deletion Settings
/del=[0,1,2,3]
Delete original files after encryption
0: Do not delete / 1: Normal deletion / 2: Recycle Bin / 3: Complete deletion
ex). /del=1 To not delete original files: ex). /del=0
/delenc=[0,1,2,3]
Delete encrypted files after decryption
0: Do not delete / 1: Normal deletion / 2: Recycle Bin / 3: Complete deletion
ex). /delenc=1 To not delete original files: ex). /delenc=0
/chkdel=[0,1]
Show checkbox on main form
ex). /chkdel=1 To hide the checkbox: ex). /chkdel=0
/delrand=[0-99]
Number of random data overwrite passes
0-99: Specify the number of overwrite passes.
ex). /delrand=3 To not perform random overwrites: ex). /delrand=0
/delnull=[0-99]
Number of NULL overwrite passes
0-99: Specify the number of overwrite passes.
ex). /delnull=3 To not perform NULL overwrites: ex). /delnull=0
Compression Settings
/comprate=[0-9] (Deprecated)
Compression setting (compression ratio)
0-9: Specify the compression ratio.
ex). /comprate=6 To not compress: ex). /comprate=0
Since ver.4.0.2.0, the “Compression” setting has been changed to three levels, so “/comprate=6” and above is “Optimal,” “/comprate=0” is “No Compression.” All other values “1-5” are recognized as “Fastest.” Therefore, use the following parameter for compression settings.
/complv=[0-2]
Compression setting
ex). /complv=2 To not compress: ex). /complv=0
“/complv=0” is “No Compression” and performs no compression on files.
“/complv=1” is “Fastest,” which completes the compression operation as quickly as possible, even if the resulting file is not optimally compressed.
“/complv=2” is “Optimal,” which performs optimal compression even if the compression operation takes time to complete.
Advanced Settings
/pf=[0,1]
Allow file specification for password
ex). /pf=1 To not allow: ex). /pf=0
/pfile=[PATH]
Password file path for encryption
ex). /pfile=C:\Temp\pass.txt
If the path contains spaces: “/pfile=C:\Documents and Settings\User1\My Documents\pass.txt”
/dpfile=[PATH]
Password file path for decryption
ex). /dpfile=C:\Temp\pass.txt
If the path contains spaces: “/dpfile=C:\Documents and Settings\User1\My Documents\pass.txt”
/nomsgp=[0,1]
Do not show error when password file is missing
ex). /nomsgp=1 To show error: ex). /nomsgp=0
/camoext=[EXT]
Camouflage encrypted file extension
ex). /camoext=.jpg To not camouflage: ex). /camoext=null
Others (Command-Line Only)
/4gbok=[0,1]
Do not show warning when output file exceeds 4GB in executable format
This option is ignored for non-executable format output.
ex). /4gbok=1 To show warning: ex). /4gbok=0
/ws=[0,1,2]
Specify window state at AttacheCase startup.
0: Normal / 1: Minimized / 2: Maximized
ex). /ws=1 In this case, the window starts in “Minimized” state.
/list=[PATH]
Specify a file list for encryption/decryption processing from a separate text file
ex). /list=C:\Temp\list.txt
If the path contains spaces: “/list=C:\Documents and Settings\User1\My Documents\list.txt”
The format of the specified file list is one file path per line.
ex). Contents of list.txt specified in the above path:
hogehoge.bmphogehoge1.bmphogehoge2.bmphogehoge3.bmptmp\temporary.htmC:\Documents and Settings\User1\My Documents\test.doc
- You can also include file paths directly as additional execution arguments (they will be processed together).
- Naturally, if a path does not exist, an error will occur during processing.
/lc=[PATH]
Specify the text file path containing the registration code.
ex). /lc=C:\Users\user1\Desktop\license.txt
Relative paths can also be used.
ex). /lc=..\license.txt
If the path contains spaces: “/list=C:\Documents and Settings\User1\My Documents\list.txt”
If the text file contains multiple registration codes, the topmost registration code is used. Characters unrelated to hexadecimal (0123456789abcdef) are ignored, so separator lines and comments can be included without issue.
Looking at it this way, argument specification can be quite cumbersome, but thinking of it as temporarily specifying only the parts you want to change while keeping existing settings intact makes it easier to understand and use.
For example,
"C:\Program Files\AttacheCase\AtchCase.exe" proposal1.doc /p=hirakegoma /ow=1 /exit=1 /saveto=encryptwould mean:
Encrypt “proposal1.doc” with the password “hirakegoma,” without overwrite confirmation, exit after processing, and save to the “encrypt” folder. All other unspecified settings will use the existing configuration.
Technical Information
About Safety Through Open Source
We have received some concerns from users asking “Is it safe?” regarding making AttacheCase open source.
While there is no such thing as “absolutely safe,” as the developer, I believe that going open source is actually safer for the following reasons.
The Encryption Algorithm Is Already Open
The encryption algorithm AES (Rijndael) used by AttacheCase has an open specification and is widely used worldwide.
An encryption algorithm is essentially nothing more than a “procedure for encrypting” data using a “secret key.” Therefore, as long as the secret key is properly managed and the procedure is used correctly, the encryption is considered safe.
Here, what matters is the handling of the “key (password)” during encryption. As long as the password remains in your possession, security is maintained.
Of course, vulnerabilities may be discovered in the future, as has happened with other encryption algorithms. A security hole could be found that allows someone to reverse-engineer the data regardless of the password, exploiting the vulnerability with machines capable of massive computation.
However, even in such a case, because it is published worldwide, information disclosure would happen quickly, enabling rapid response.
Greater Transparency
With the source code exposed to everyone’s eyes, the likelihood increases that potential vulnerabilities outside the encryption algorithm and memory leaks affecting overall PC behavior will be discovered and fixed.
Several memory leaks have already been discovered and improvements and fixes have been made with each version update.
Concerns About Backdoors
Going open source eliminates concerns about whether backdoors or malicious scripts have been planted.
Even after going open source, AttacheCase distribution involves building on my local PC, creating an installer, and publishing it.
Of course, I develop with users in mind and have never planted viruses, backdoors, or intentional defects (doing so would be a crime, naturally).
However, there are indeed people who cannot fully trust even that. This is particularly true for government agencies handling important classified information, major corporations, or development companies wanting to integrate it into their systems.
In that case, since it is open source, the ultimate option is to download the source code yourself, verify there are no malicious elements, and build it with your own hands. As long as you have the development environment, you should be able to produce the same product.
Summary
In conclusion, by making AttacheCase open source, rather than reducing safety, I believe transparency increases and safety moves in a more secure direction.
About the Encryption Algorithm {#encryption-algorithm}
AttacheCase uses AES (Rijndael) as its encryption algorithm.
Rijndael is a new encryption algorithm developed by Belgian mathematicians Joan Daemen and Vincent Rijmen. In October 2000, it was selected by the National Institute of Standards and Technology (NIST) as the next-generation encryption standard AES (Advanced Encryption Standard). It was selected through a public competition, with other finalist encryption algorithms including Twofish, RC6, MARS, and Serpent.
Previously, an encryption algorithm called DES, developed by IBM, was widely used. However, due to the remarkable improvement in computer performance and advances in algorithm analysis, its strength became insufficient. A new encryption algorithm needed to be adopted. That is where AES (Rijndael) appeared.
The characteristics of “Rijndael” include the ability to specify key and block lengths from 128, 192, or 256 bits, with the possibility of further extension. AES specifies a fixed block length of 128 bits.
Additionally, unlike other finalist encryption algorithms that use the Feistel structure (Feistel network) — a common algorithm for bit conversion during encryption — Rijndael uses the SPN structure, performing three different unique transformations to achieve powerful encryption.
AES is, in principle, an openly published specification. Therefore, anyone can use it for free and freely incorporate it into source code. Moreover, since researchers worldwide are constantly verifying it, its cryptographic strength is well-established (even if it were broken, information would be available immediately).
AES is also designed to run on various platforms, so it has high processing speed and is an excellent algorithm.
More than 20 years since its official adoption in 2000, we hear that the transition from DES to AES has progressed considerably in the United States. In Japan as well, integration into software has been increasing, and its track record is being proven.
Information about AES (Rijndael) can be obtained from the following sites:
Advanced Encryption Standard (AES) - NIST https://www.nist.gov/publications/advanced-encryption-standard-aes
BrianGladman/aes: AES code - GitHub https://github.com/BrianGladman/aes
Source code that runs on various other platforms is available at the following site. If you are interested, feel free to explore:
AES implementations - Wikipedia https://en.wikipedia.org/wiki/AES_implementations
Also, in this age of internet and broadband, even individuals exporting encryption algorithms (or software containing them) to foreign countries may violate international treaties.
While regulations have been considerably relaxed compared to before, exporting for military purposes to countries designated as state sponsors of terrorism by the United States and others can still be legally punishable. This probably applies only to cases of clear intentional action, but please be cautious just in case…
As of 2021, the state sponsors of terrorism are:
Iran, Syria, Cuba, and North Korea — four countries.
Encryption Mode
AttacheCase used to encrypt (up to ver.1.**) using a method called “ECB (Electronic Codebook) mode.” It simply encrypts each block and writes it directly to the encrypted file. Illustrated, it looks like this:
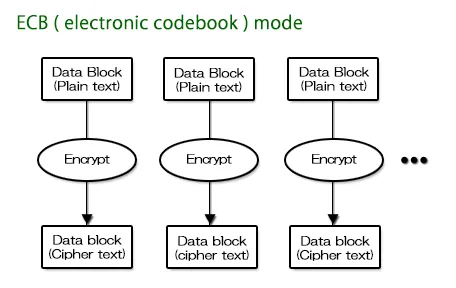
With the same file and same password, the exact same encrypted file is generated. Therefore, with this method, block-level analysis becomes easier due to the characteristics of the encryption.
However, it cannot be denied that there is a weakness of “ease of verification.” Therefore, from “AttacheCase ver.2,” encryption was changed to a method called “CBC (Cipher Block Chaining) mode.” A simplified diagram is as follows:

As evident from the above diagram, first an “Initialization Vector (IV)” — a block of random data — is generated.
This is XORed (exclusive OR) with the data block before being written to the encrypted file.
In other words, starting from the initial random data, the data is chained together and wound up to generate encrypted data. As a result, because a random value is given at the start, even encrypting the same file with the same password will never produce the same content. This eliminates the weakness of “ease of verification” from encryption characteristics.
Then, how can the original be restored (decrypted) when random data was given at the start? The following diagram explains:
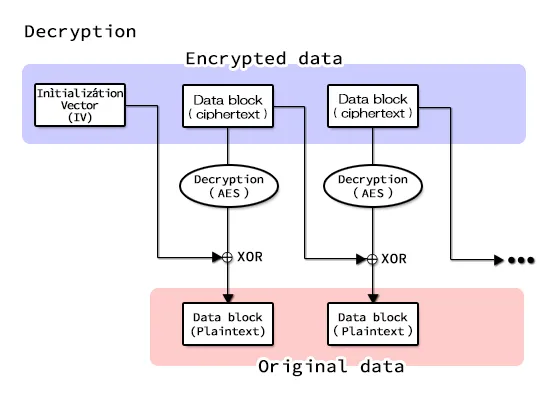
The initial random block data is also written to the file, so it can be restored to the original.
But even though that random block data is written in the file, could it be used as a starting point for analysis?
No, it cannot. Unless the encrypted block data is first analyzed and decrypted, the random data is useless for analysis even if visible. The random data cannot be used as a starting point to unravel this chain.
Key Derivation Based on RFC2898
Starting from AttacheCase ver.3, RFC2898-based key derivation is used to derive the data password key and initialization vector (IV).
For example, even though you can specify up to 16 characters for the password string, if you enter only “a,” 15 characters are left empty.

Therefore, it is safer to generate a random string from the entered password and properly fill all 16 bytes before encrypting.

Specifically, based on “PKCS #5: Password-Based Cryptography Specification Version 2.0,” a salt (literally, salt) consisting of random numbers is mixed in, and password-based key derivation is repeated 1,000 times. The derived key and initialization vector are then sequentially output and used as the key and initialization vector for encryption, respectively.
However, even with this countermeasure, it remains powerless against brute-force attacks. We strongly recommend using as long a password string as possible.
From SHA-1 to SHA-256 {#hash-algorithm}
“SHA” stands for Secure Hash Algorithm, and is one type of Message Digest Algorithm. It is an algorithm for condensing (summarizing) large data into fixed-length small data sequences.
Since the same data always produces the same condensed data, it is used to check file integrity, store message digests instead of raw passwords for comparison, and strengthen security.
Even the slightest edit to a file (even changing just 1 byte) produces a completely different message digest. To put it in analogy, it is like a “fingerprint” of the file, generating a unique value.
Of course, since any large file (data) is condensed into smaller data, it cannot be completely denied that different data might produce the same result, but the probability is extremely low and considered practically unproblematic.
In AttacheCase, SHA-1 hashes were used only for password files. However, vulnerabilities in SHA-1 have been pointed out recently. While there are opinions that “the impact is minor” given the nature of the vulnerability, and it could be argued that it is not a problem for AttacheCase’s use case, migration to more secure SHA-256 and SHA-3 has been progressing. Therefore, AttacheCase has adopted SHA-256 for the hash used in password files.
Consequently, files encrypted with password files in the past cannot be decrypted from ver.3 onward. Please decrypt old files with an older version first, then re-encrypt with ver.3 or later.
About the Compression Algorithm
For compression processing, the zlib library is incorporated and used. The compression uses “DeflateStream” from .NET Framework 4.5, which internally selects zlib.
zlib is a library implementation of the compression algorithm used in zip and gzip, and is freely available. It has a high compression ratio (said to be higher than lzh, though it depends on the data content) and fast processing. Above all, the biggest advantage is being able to provide compression functionality independently without requiring an archiver DLL.
Incidentally, the “PNG” graphic data format also uses zlib compression.
Support
Commercial Use
Windows
During the beta testing period, it can be used free of charge. While we designate a “trial period” of one month, the application has no such restriction and can continue to be used for evaluation. Please evaluate thoroughly before making a decision and payment.
The planned price is 1 license (1 user) = 550 yen (tax included).
However, the price may change based on user feedback.
The following users can use the free license version at no charge:
- Home/personal use
- Students and educational institution personnel
If you are a personal user but would like to “support” or “donate” by making a payment, that is most welcome. In that case, a registration code will be issued just as for commercial use.
Along with this change, support for older versions ver.3 and ver.2 will be discontinued (fully ending in April 2022). However, older versions can continue to be used free of charge regardless of personal or commercial use.
macOS
The macOS version can be used free of charge by anyone (regardless of personal or commercial use).
However, this applies to downloads from this website. Future versions available on the App Store may be paid (regardless of personal or commercial use).
The price is planned to be comparable to the Windows version.
The reason why downloads from this website (including the macOS version) are free while the App Store version is paid is explained in the following section.
Reasons for Paid Commercial Use
There are various reasons, but they include website management and maintenance costs, software development continuation costs, and particularly the cost of “code signing certificates” required to verify safety on Windows and enable installation without warning messages. For macOS, there are developer registration fees (Apple Developer registration), and with declining advertising revenue, it has become increasingly difficult to cover all these costs.
We receive many emails with bug reports and complaints, but we cannot see who is using the software, and frankly, motivation has been declining.
Note that the source code is published under the GPLv3 license (the macOS version source is not public), so there are no restrictions on building and using it yourself.
The charges apply only to downloads from this official site or the App Store (currently not published on the App Store as beta testing is ongoing). In other words, think of it as costs related to distribution, including development maintenance costs and code signing certificate fees.
Copyright Notice
“AttacheCase4” Copyright (C) M.Hibara, All rights reserved.
Mitsuhiro Hibara
License {#license}
The source code license is “GPLv3 License.”

Copyright (C) 2016- M.Hibara
This program is free software: you can redistribute it and/or modify it under the terms of the GNU General Public License as published by the Free Software Foundation, either version 3 of the License, or (at your option) any later version.
This program is distributed in the hope that it will be useful, but WITHOUT ANY WARRANTY; without even the implied warranty of MERCHANTABILITY or FITNESS FOR A PARTICULAR PURPOSE. See the GNU General Public License for more details.
You should have received a copy of the GNU General Public License along with this program. If not, see http://www.gnu.org/licenses/.
FAQ (Frequently Asked Questions) {#faq}
Q. I forgot the password I used for encryption. How can I decrypt the file? Is there any way to crack it?
There is nothing that can be done. Please give up. For more details, see If You Forgot Your Password.
Q. I get the error “An error occurred during file creation. Failed to create ''. Aborting decryption process.” and cannot decrypt properly.**
This error message is displayed when an attempt to create the file ”**” failed for some reason. Possible causes include the file being edited by another application, or the hard disk or media being in a non-writable state.
Q. The file association setting does not take effect (encrypted files do not show the AttacheCase icon).
On Windows XP and later, file association settings will not take effect when logged in as a restricted user. This is a Windows specification for security considerations. To enable file association for AttacheCase encrypted files, you need to launch AttacheCase once with administrator privileges (file association is configured at startup).
Q. I output a self-extracting executable with a previous version, but it fails to decrypt with an error. I cannot restore my file. What should I do?
This was caused by a bug in a previous version of AttacheCase. The encrypted file (the contents themselves) is not corrupted, but there was a problem with the decryption program. In this case, drop the non-decryptable self-extracting executable file (*.exe) onto the latest version of AttacheCase and decrypt it directly.
*Q. During decryption, the message “An error was returned from zlib! Error number: ” was displayed and the process was aborted. What is this?
It appears that an error was returned from the library used for compression processing. Possible causes include the encrypted file being corrupted during copying to media, or corrupted data being created when the target file was edited by another application during the encryption process.
Other
It Is Not “Attashu” Case
This is completely trivial, but until recently, the developer had been calling that briefcase an “Attashu Case” (embarrassingly). There are probably many others who make the same mistake.
Indeed, it is not in the dictionary, and I only learned this when naming this software during development. “Attache” is the correct pronunciation.
“Attache” appears to be a French word, and according to the Iwanami Kojien dictionary:
Attache — A professional staff member dispatched to an embassy or legation. Historically, specifically a military officer attached to an embassy or legation.
So, it seems that the briefcase carried by diplomats and similar officials came to be called an “attache case.”
Incidentally, searching the internet reveals several attache case retail sites that misspell it as “attashu case.”
A user once emailed me saying, “There was a song in a commercial for a certain energy drink that went ‘An attashu case is a symbol of courage,’ and that is how I got confused.” Come to think of it, that may have been the reason for my own confusion as well.
The Inspiration for Development and Reasons for Going Open Source
The original motivation was simply “I wanted to use it myself.”
When I frequently brought work data home, there was no cloud computing back then, and there was no way to safely exchange data via websites (there were some methods, but they cost money).
At the time, I tried various paid and free software, but none of them were quite right… The algorithm is easily available, so is it not just a matter of attaching a GUI to it? It is just garnish, right? Well then, I will just make it myself —
That casual impulse is how development began.
Back then, “encrypting things” was seen as somewhat niche — like something an intelligence agency would do. How much secret data do you have, anyway? An acquaintance even told me it was “scary.” The nuance was probably closer to “creepy.”
At that time, there were software products boasting “you can use various encryption algorithms!” when AES alone was more than sufficient. It was an era where encryption was something enjoyed by enthusiasts.
However, a few years later, with frequent customer information leak incidents and the establishment of personal information protection laws, “encryption” suddenly became mainstream.
That was when AttacheCase users increased explosively. We started receiving inquiries from government agencies, local governments, and major corporations implementing it company-wide. Even now, there are quite a number of downloads from this site.
Then, a slight anxiety crossed my mind that this was becoming more than I could handle alone… and that is when the incident happened.
A Vulnerability Is Discovered in AttacheCase
I never imagined that a vulnerability would be reported in my own software.
Forgive me, but I had thought this was something that only happened in another dimension, to browsers like IE and Firefox or famous applications.
It was covered in online articles, my website (which was on @nifty’s homepage service at the time) was temporarily shut down due to access load, and things got a little noisy around me.
The details of the experience are documented in a blog post, so please check it out if you are interested.
At that time, I received an email from someone suggesting “Why not make it open source?” and it crossed my mind again. However, at that point, I was not ready to go open source immediately. The source code, which had been patched and extended repeatedly, was a mess, and I could not even tell which parts were currently in use.
It was not something I could show anyone… I thought I would deal with it eventually…
Time just passed with that thought, until a decisive event occurred.
A Serious Illness Leads to Going Open Source
The catalyst was a serious illness. I nearly died.
When I was hospitalized, I had other things to worry about, but when I returned after a narrow escape, and saw the massive amount of emails about AttacheCase (mostly bug reports, ha), I thought “This will not do…”
If I were to die, I did not want to inconvenience the users of my humble creation — and while the exact number is unknown, there are presumably tens of thousands of them.
The aforementioned vulnerability discovery was also a push. I also felt that continuing alone in a closed world had become too heavy a burden.
Right around that time, GitHub, a social service for programmers, had matured to a good state, and —
“I had to ride this big wave.”
I promptly created an account.